UFS Portal Tool for editing and scrutiny of data
The portal tool helps to edit the data present on Bhuvan server easily. It also has several added checks to scrutinize the data and even download all the data in multiple formats. It enhances the existing portal by providing tools that help in overall faster, easier and hassle free work.
Features
The tool allows you to log in with JSO, SSO, SRO, RH, ZO and HQ ids and remembers them for you. The interface is very simple and can be opened easily on a mobile device as well.
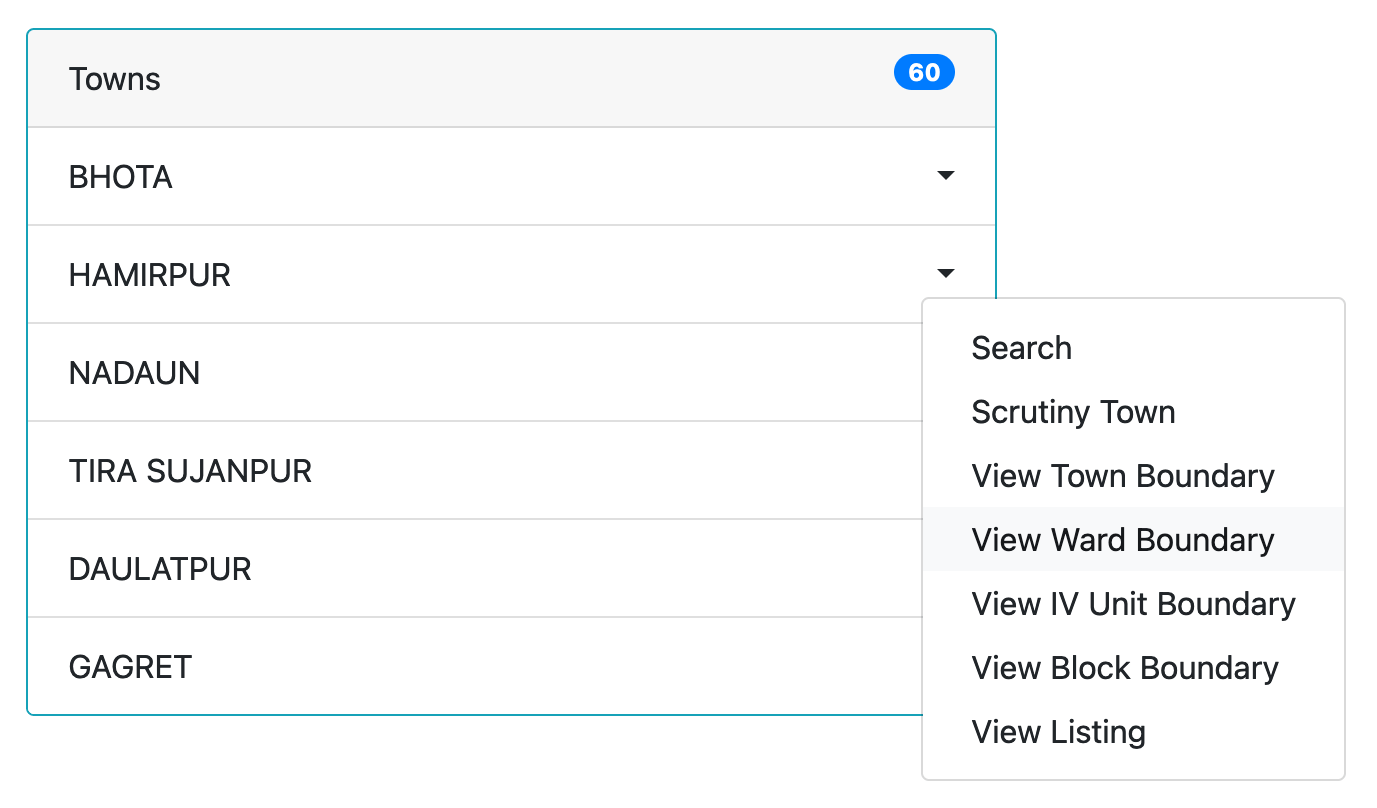
Each user is presented with a different dashboard showing the main highlights required for working. For example a JSO and SSO will see the details about the number of wards, ivs, blocks and listing present in their id, while a RH will see the list of available towns and users for performing action on them.
All the pages have been tightly integrated with each other for example, when editing any listing entry, when you return back to listing page, you will land exactly at the location you edited the listing item.
There are no scrollbars in horizontal direction making it easier to reach the required data and perform the operation.
Minimal representation of data - only the data that you need to see will be shown while hiding all the redundant data for example the name of town need not be displayed in each listing item.
You can easily filter through listing based on several parameters like block number, ward number, status, number of households etc. And also you can sort the data in any order for easier workflow.
You can scrutinize the data uploaded in the portal with in-built checks that will suggest as you perform edits on them.
You can download the data in many formats, which can be used for keeping a backup or even get the list of households with location.
You can also cross check the record numbers of features drawn in QGIS directly with portal, and even update the record numbers of features missing them or incorrect values.
There are many more features that can be seen throughout the tool.
Different Users
The portal tool supports all the users with implementation of roles that they can perform:
- JSO IDs can be used to log in to the JSO's portal, which will allow you to perform edits to data uploaded to the portal, delete data from portal, submit the data to SSO and even export all the data. JSO can also scrutiny the data himself based on the checks incorporated before sending the data further.
- SSO IDs can be used to view the data in the portal with its current status. The data received from JSO can be submitted as well as rejected using this tool directly. It also supports export of data and scrutiny of data as well.
- RH ID can be used to view all the data uploaded on the portal by JSOs. It can also be used to accept or reject the data received from SSOs. RH can also view the IDs created with the towns, current UUID status and can easily perform operations like activation, deactivation, clearing UUID, resetting password and even creating new IDs.
- Other users including SRO, ZO and HQ are also supported by this portal. These users have very limited access (as defined by Bhuvan Portal) like viewing the data uploaded and its current status. In addition to this, they can perform scrutiny (but cannot make any changes to data), download the data and even see list of available towns in their profile.
Note: This manual shows the process of using the portal. It has some similarity to the original portal in many cases, and has differences in some cases. Also, there may be multiple options to perform the operations shown here, and may even be shorter ways for them as well. This manual tries to show the ways which will ensure that nothing is wrongly edited by following some extra steps. You are free to explore and test the functionality of the portal. Also, it is advisable to download data before and after making any big changes (as it was advised in the original portal as well).
Introduction to Portal Tool
Before we dive into the usage of tool, let's understand about the working of the tool first.
Working of the tool
The tool basically works as a new UI for the portal with feature enhancements. All the data that you see after login is fetched from the original portal and all the changes you make to the data gets reflected by the original portal as well. All this happens behind the scenes. Whenever you request for any data, the request is sent to the server which then requests the data from the Bhuvan server. After this, the Bhuvan server responds with the requested data and the response is parsed and formatted by the intermediate server which then passes on the data in a different format to the web browser. Then finally, the result is displayed in the browser.
All of this happens over a secure medium i.e. HTTPS/TLS and no data is saved in the intermediate server about any of this activity. It simply relays the requests and changes the format of data retrieved.
All the storage of data happens at the browser level. All your data including your login details (user name, town, district etc) are saved in the browser only. Also, this allows the website to run faster as all data is to be read from the browser only. Also, fewer requests to server also means, lower load on the Bhuvan server.
Log in Screen
The first page that is displayed when accessing the portal is the login screen. Here, you can log into the portal using the User IDs that you use to log into Bhuvan Portal. Once you log in, the ID will get saved to the recently opened IDs, which can be seen on the left side of the login box. If you keep the Remember me check box checked, you will not have to enter the password next time and it will shown in the history along with town details. 🔑 means that the ID has been saved with the password, and with one click it will be logged in.
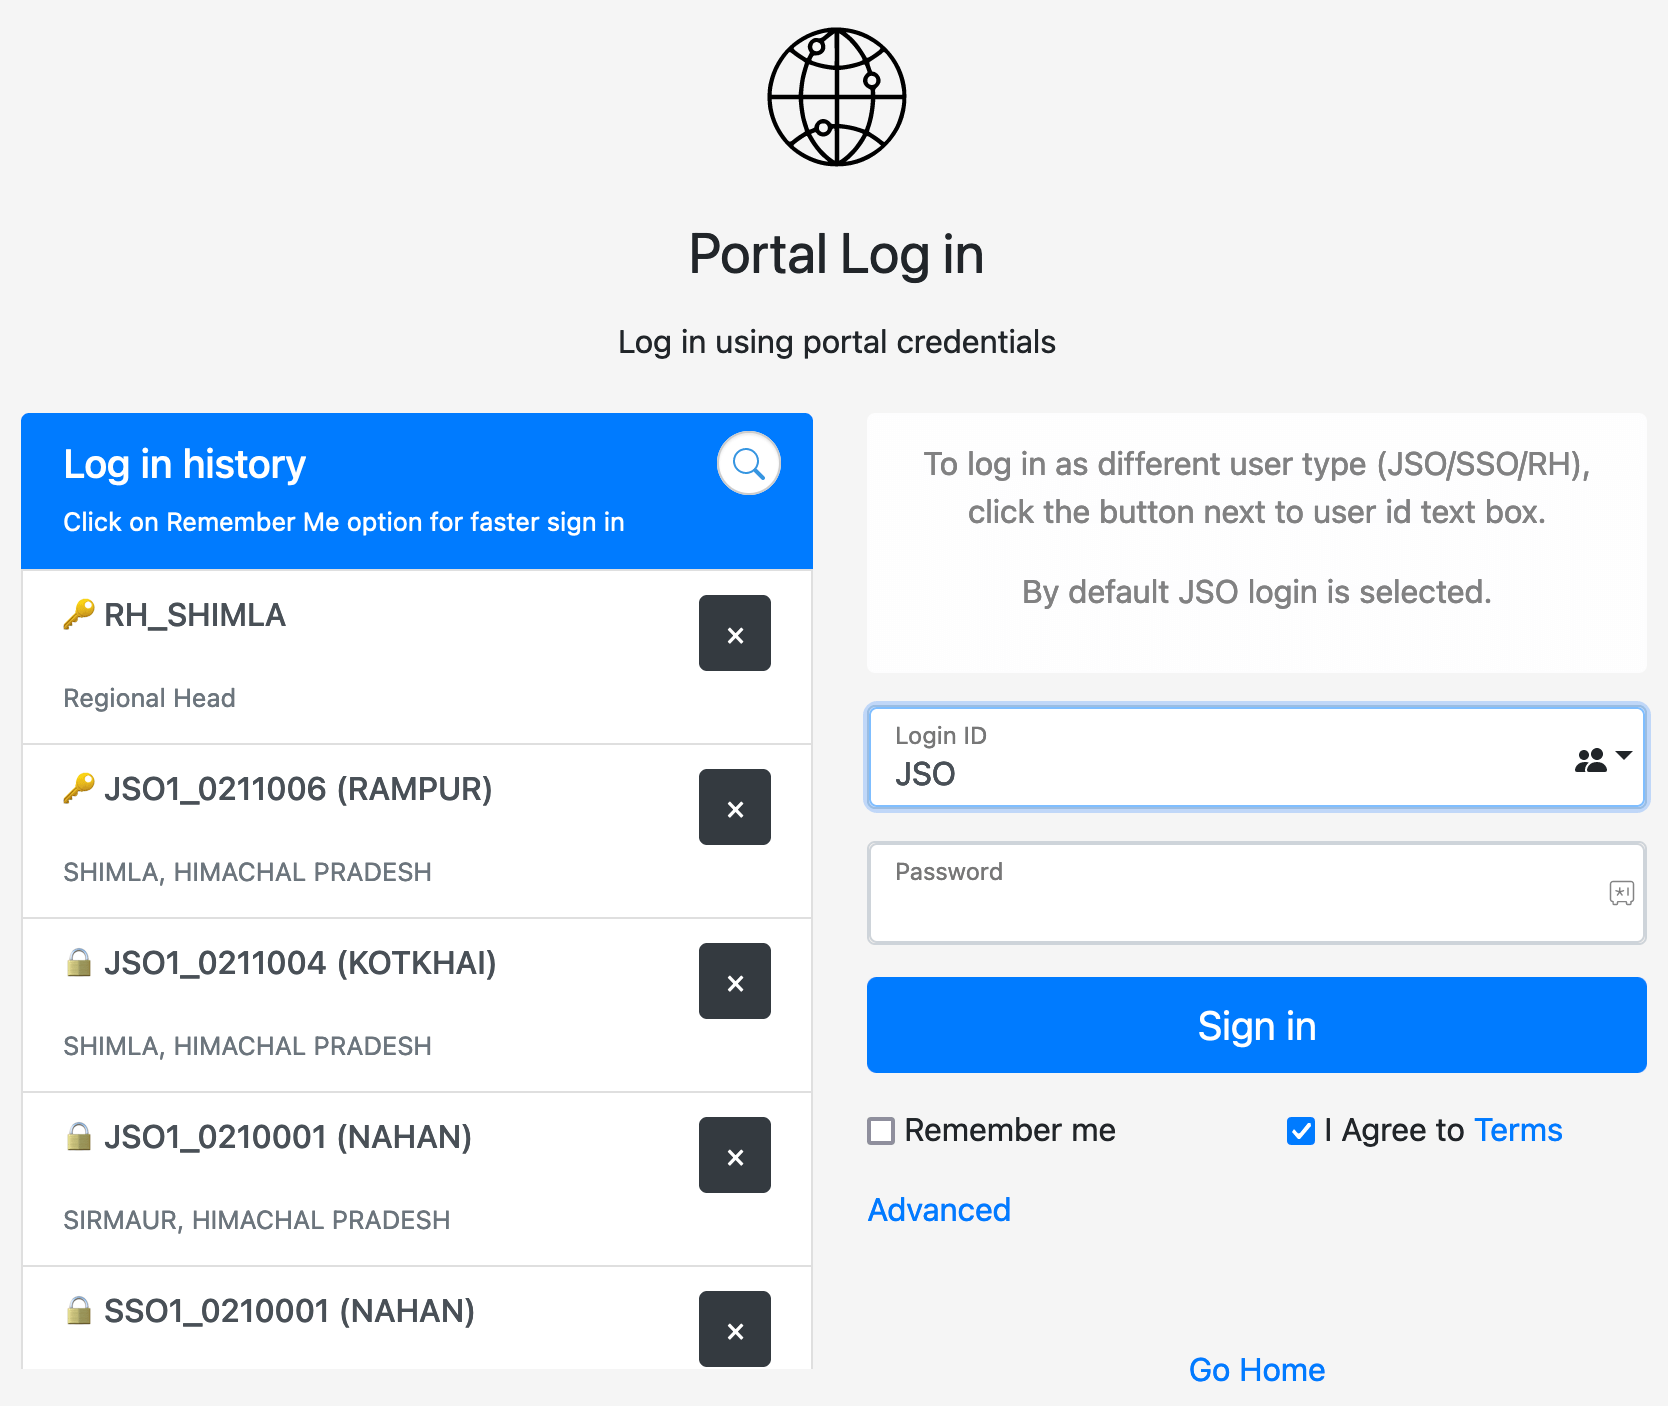
The portal tool supports all type of users as supported by the Official portal. To switch to another ID type, you can either use the switch user button shown next to the login id text box or you can simply type in id and password to log in. The button is especially useful in mobile devices.
If you log in using a mobile device, you will see the numeric keyboard to enter the user name. This keyboard is shown only for JSO ID and SSO ID (as they contain mostly numbers). To insert an underscore using the numeric keyboard simply tap any character on the keyboard including +, -, /, (, ), #, P etc as available on the keyboard and it will be converted to an underscore automatically. Then you can type in the rest of your login ID and password.
You can also remove the login ids from the history by clicking the cross button shown next to the login id. And all the login IDs will be saved in the list as it can be seen by scrolling the history box.
You can also search login IDs by the town with which they are associated. To do so, simply click on the search icon and type in the name of town, district or state or even partial login id and the ids will be filtered based on your search.
After you click on the log in button, you will be logged in to the portal and will be shown the dashboard containing information about the data stored in the current ID.
If the login ID is not activated or has been disabled due to multiple invalid attempts, you will be alerted accordingly.
Portal Dashboard
The dashboard will be shown to JSO and SSO ID only. It will show the details about the town to which the ID is associated including the District and State. Initially you will see the status of boundaries available in the ID, then each of boundary will be loaded sequentially and tell you the exact count of data available under each item. Some of the items may be shown as Not available, if there are no items uploaded in this ID.
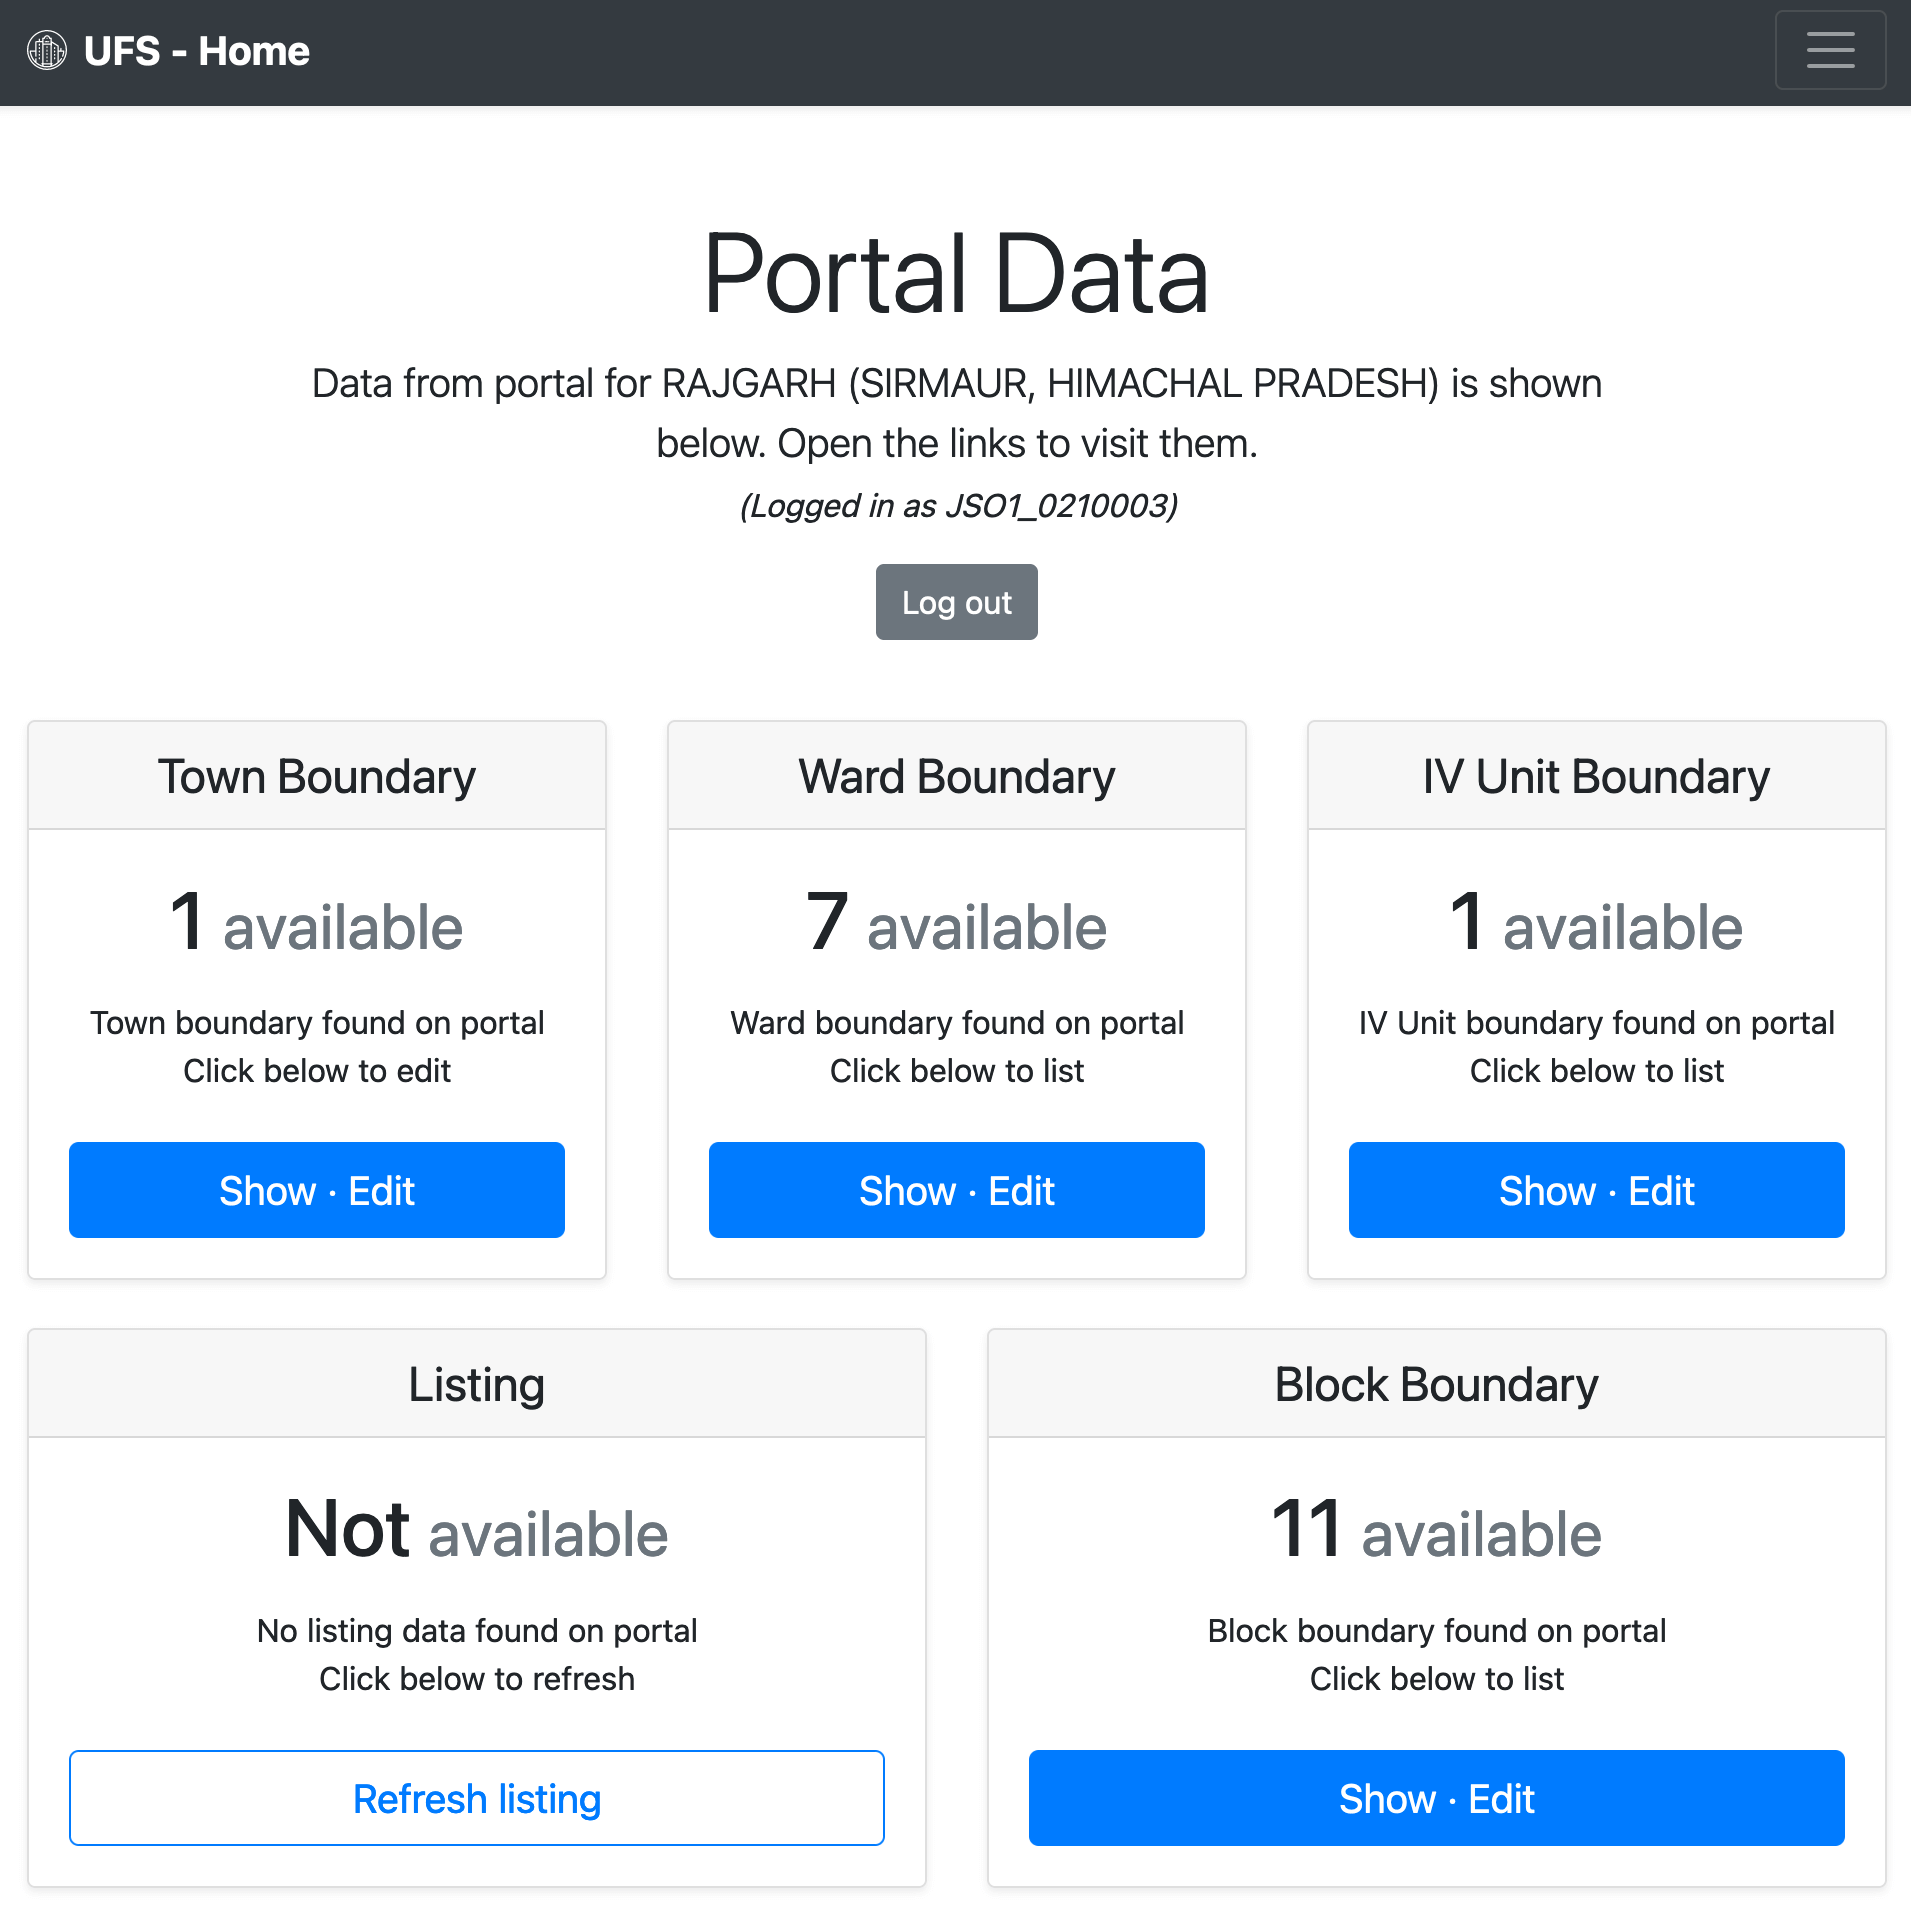
For example in a town where all the listing work has been done in UFSL, it will show the listing as not available and similarly for an ID where there is no town boundary is present (or present in another login id), it will show not available for town boundary, and same will be the case for ward boundary in a census town.
To edit or view the data under each type, you can click the button given below the items, and you will be redirected to appropriate page for further action.
Portal Dashboard for Regional Head
For RH, the dashboard will show the list of all available towns under the given ID. It will display a short list of available towns, and the user can also search in the available towns by typing in the search box. The search will also provide suggestions by district as well.
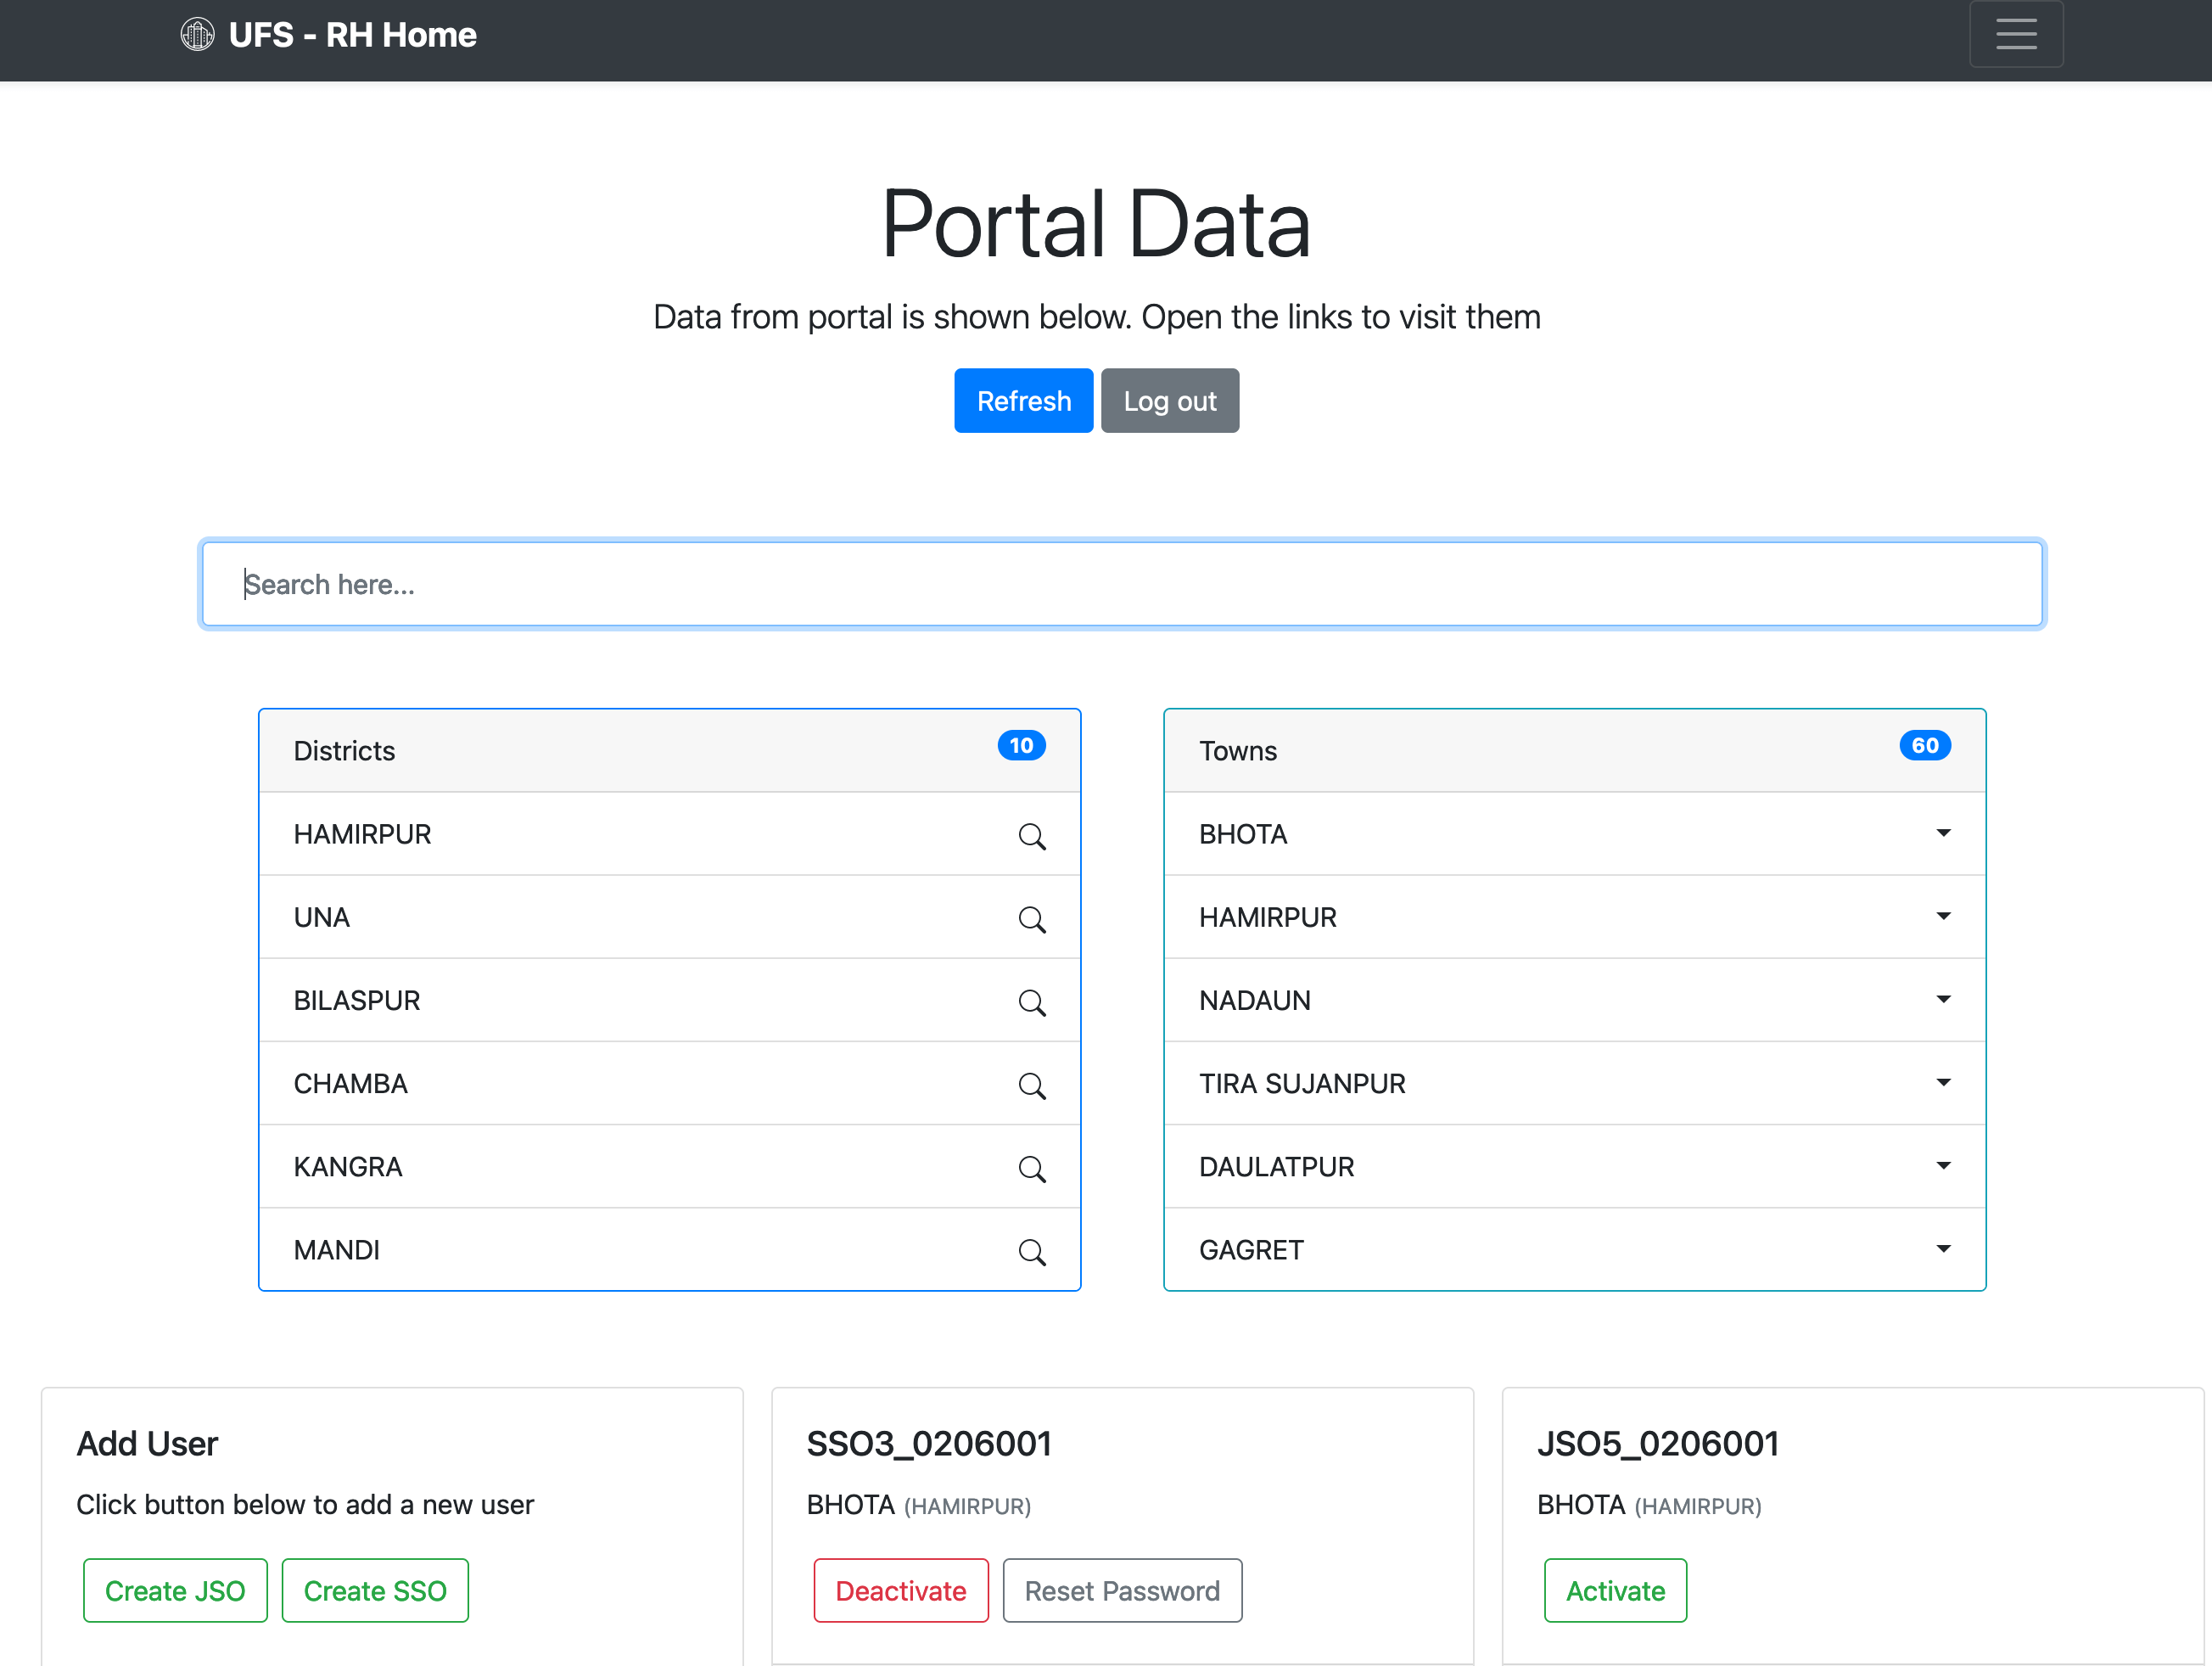
Below the list of towns, the user will see the list of available SSO and JSO IDs along with their current status - if it is activated or not, and also UUId of device registered if any. The given IDs can be activated, deactivated, UUId cleared and even reset their password directly from the dashboard. The facility to create a new JSO and SSO is also available right from the dashboard.
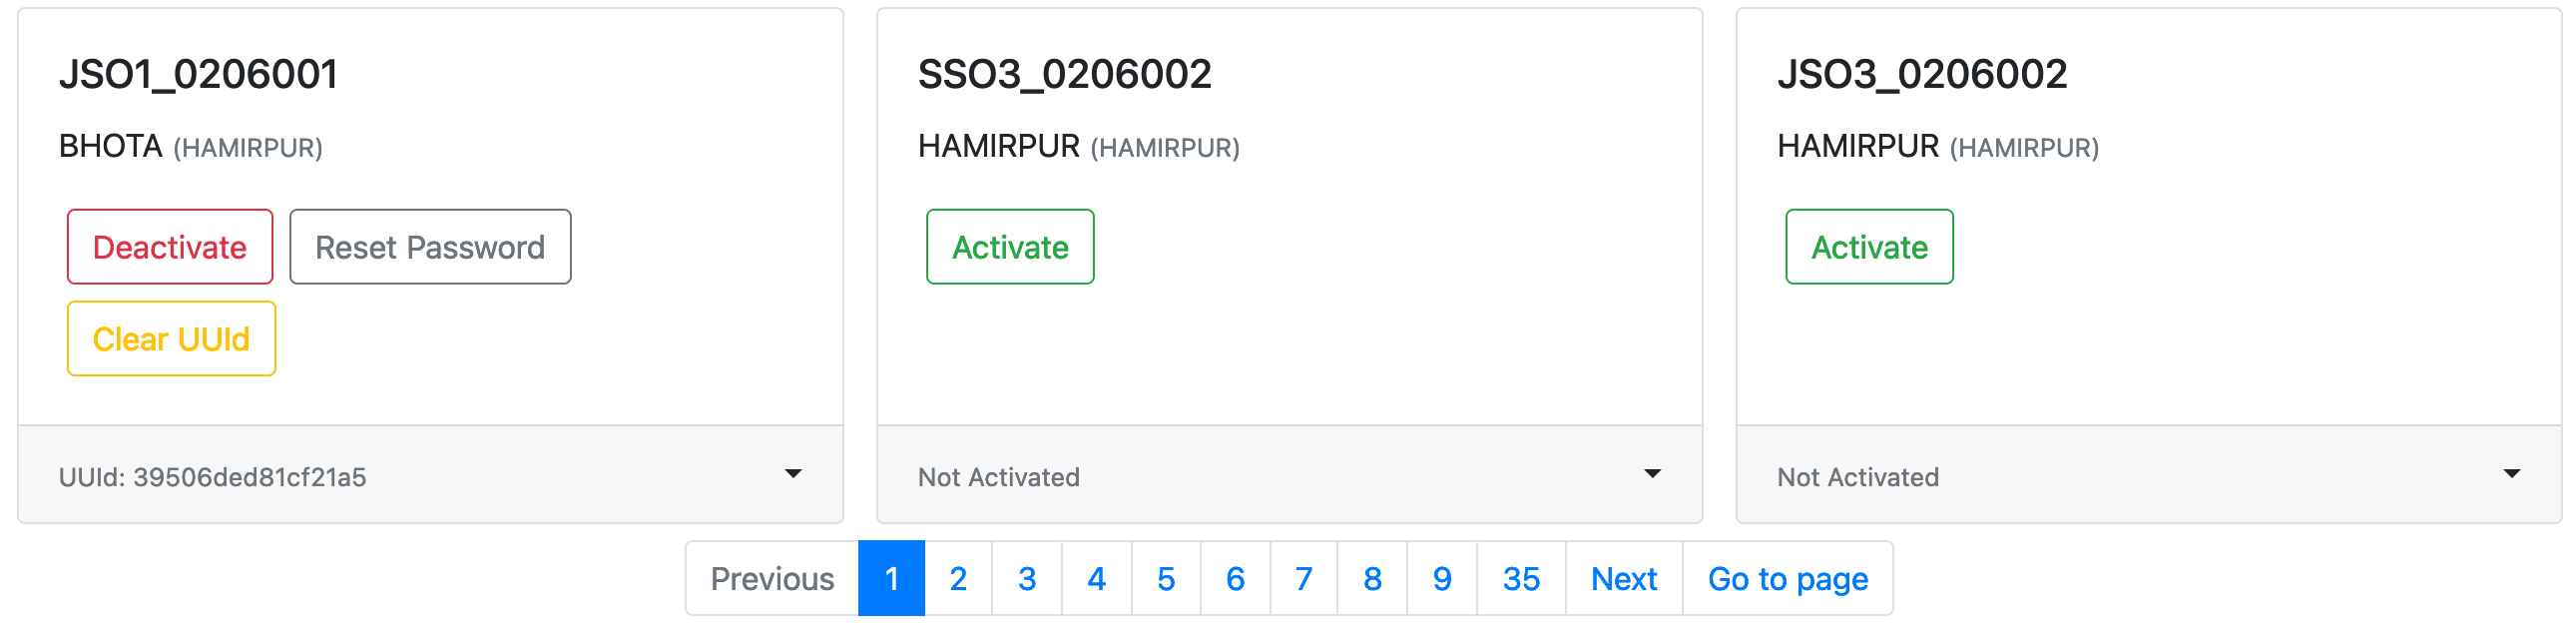
All these IDs are displayed 12 at a time and rest can be accessed by navigating to next pages using the pagination at the end of the page.
To view data of individual town, the user can click on the tiny mark displayed at the right side of the town name and choose the type of data they want to view. They can also conduct scrutiny of the data but they will not be able to modify any data.
Clicking the search icon or button next to district or town (respectively) will show the login IDs belonging to those towns only.
Portal Dashboard for SRO, ZO and HQ
Other users will see a different dashboard than the one provided to RH. Since, they only have ability to view the uploaded data only, the dashboard has been kept separate for these users. After login, they will be able to see the list of towns available with them. And they can view the data of any town, they can click the buttons provided next to the town names in the table displayed.
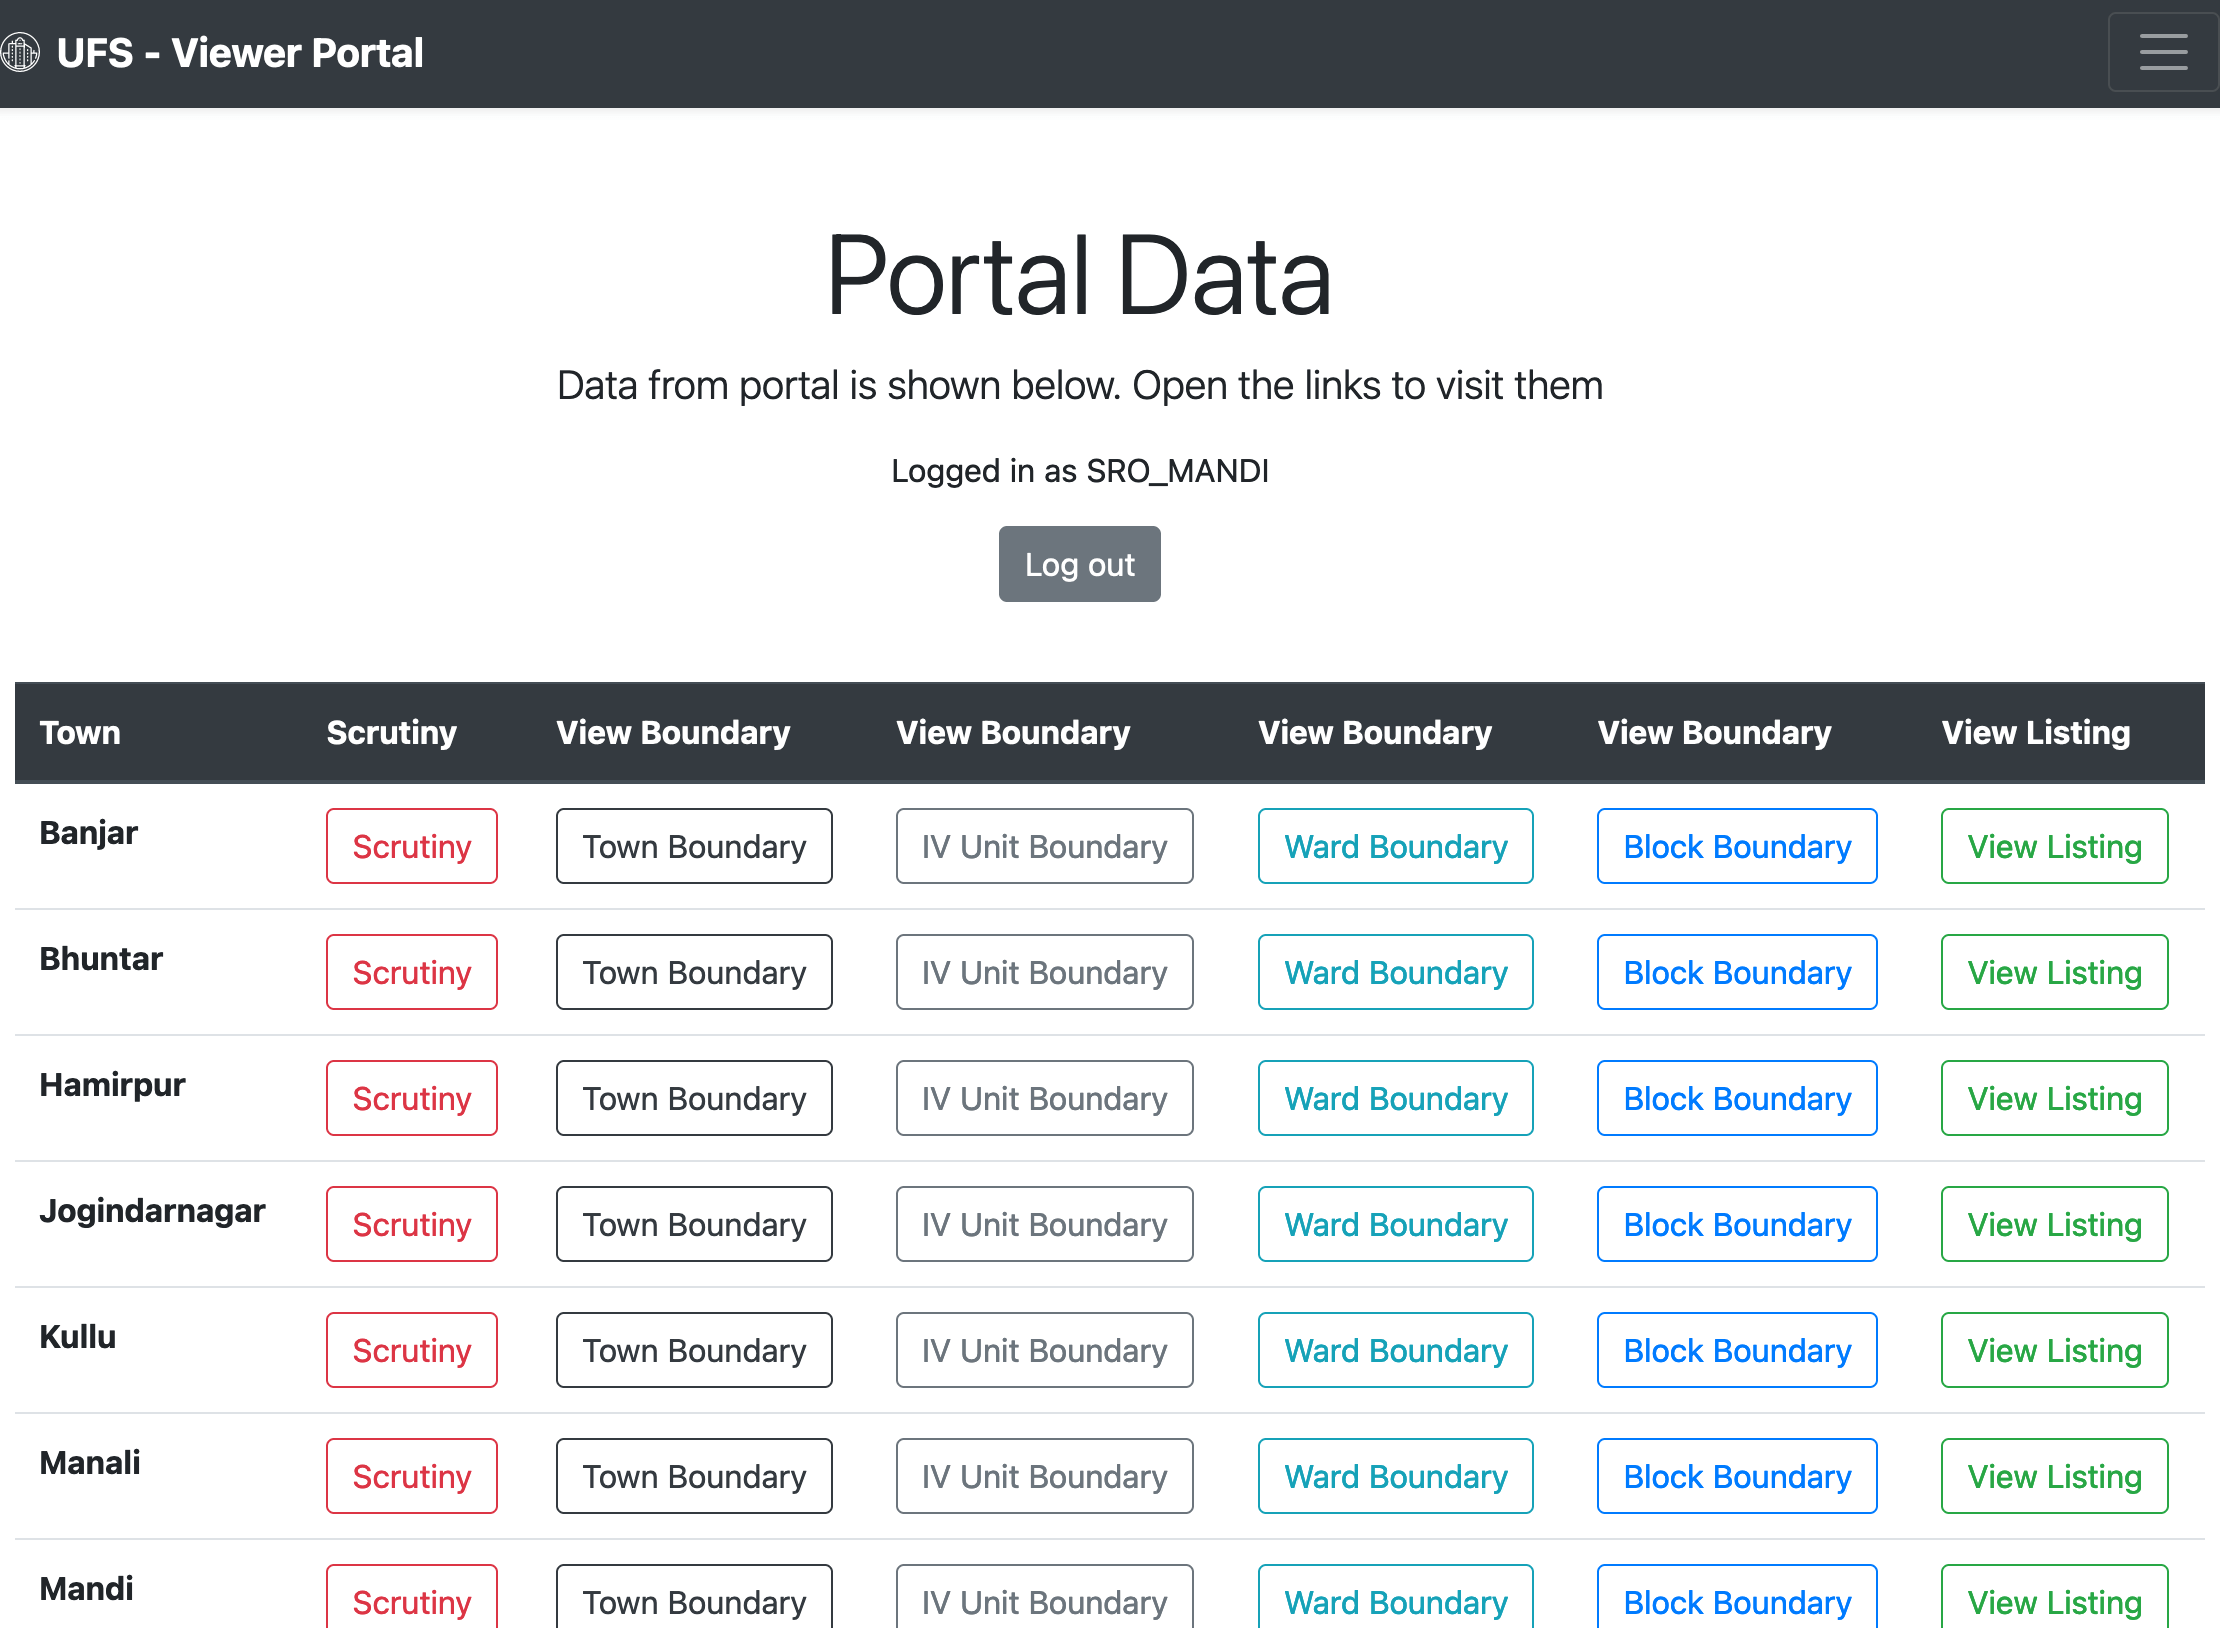
These users can also conduct scrutiny of the data, but they will not be able to edit any data themselves.
User can log out from the portal any time by clicking the log out button given at the top of their respective dashboard page. Also, closing the current tab/window will also log out the user immediately.
Portal Data Pages
All of the data is visible on different pages and is available to all users. The working is same for all users. For example, the town boundary will be shown in town.html page and similarly, the scrutiny of data can be conducted using the stats.html page and scrutiny.html page.
Each page has been given navigation links that can be seen at the top for easier navigation around the portal.
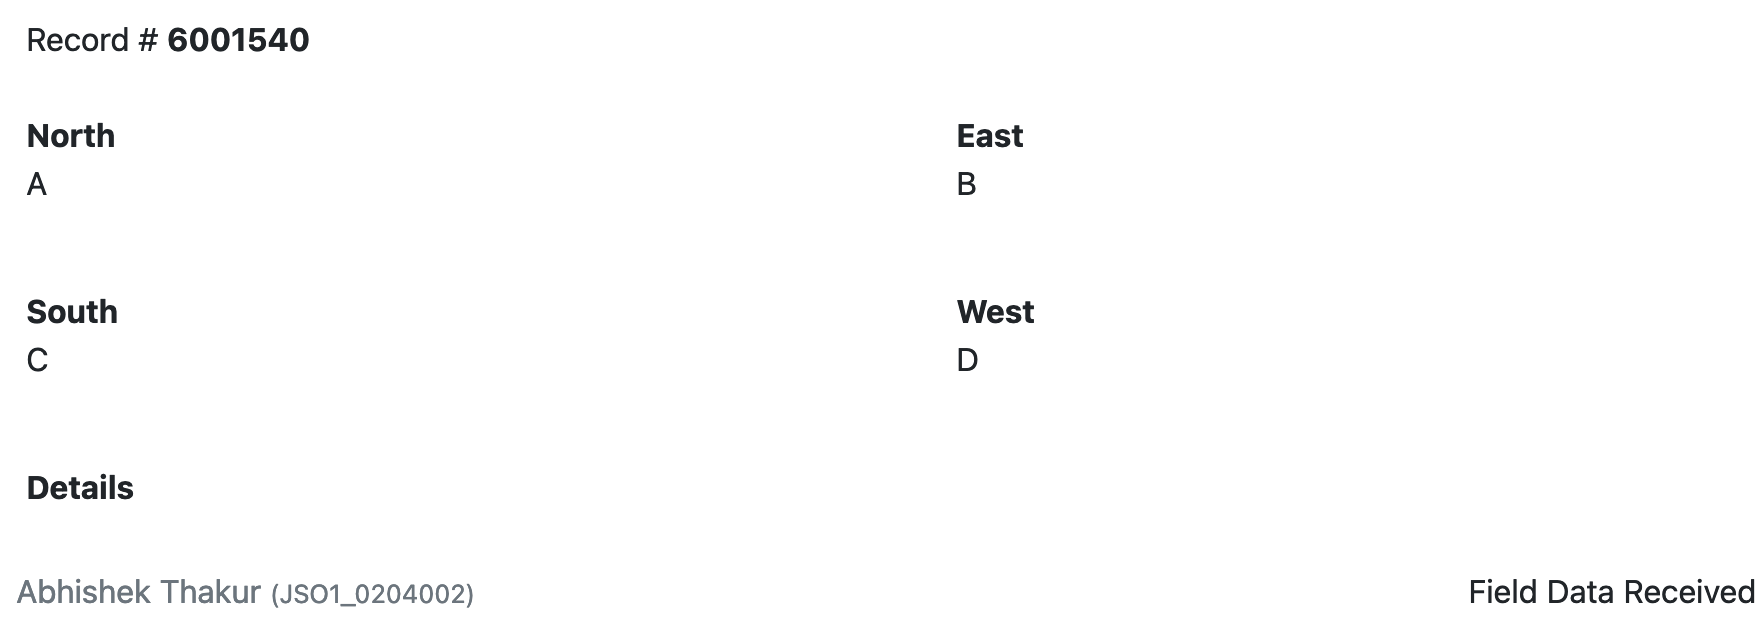
Town Boundary
The town boundary for given town/id will be shown in this page. It will only show the necessary details - North, East, South, West and Details. All other unnecessary fields will be hidden. In the above screenshot, there are different buttons are provided for action - Submit, Delete and Edit Data. Clicking Submit will submit this boundary to SSO for further action, whereas clicking on delete will delete it from the portal (after confirmation), and to edit the details of this boundary, JSO can click on the edit data button. The user will then be redirected to a different page to edit the details and save them.
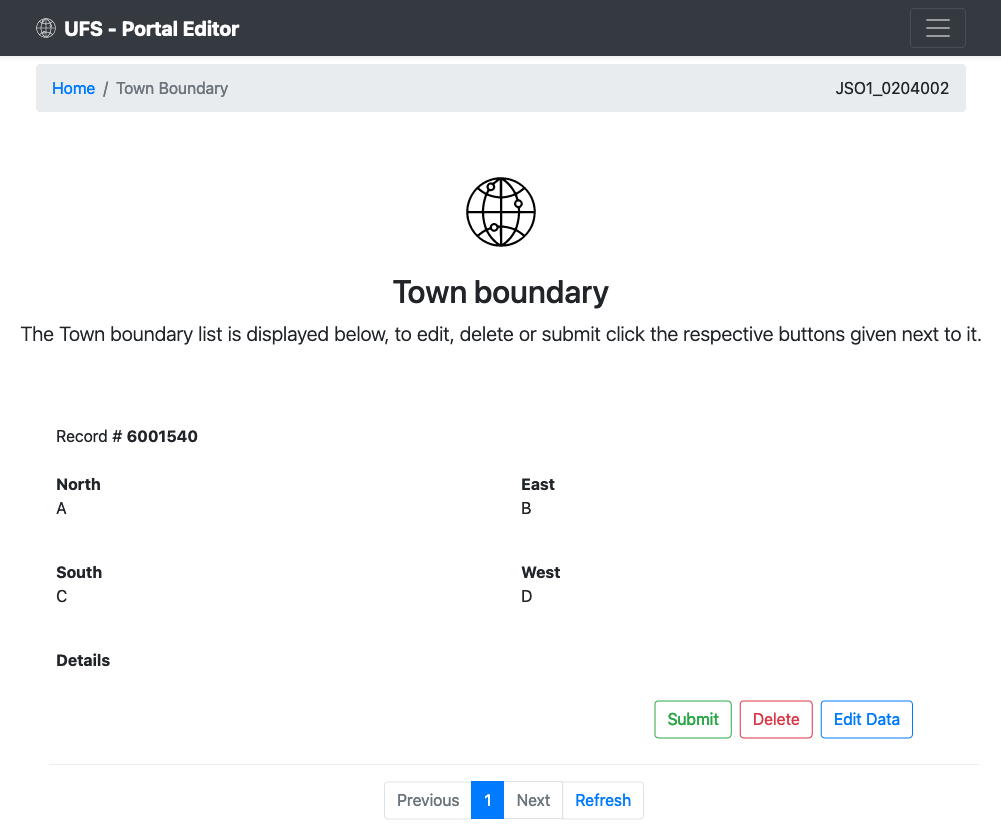
After editing the data, the save button below the page can be clicked and upon successful updation, a message will be displayed to user and the color of the save button will also change. These subtle hints are provided through out the portal for better user experience.
Each user will be shown different actions based on what they can do with the data. Here, for example, this boundary has been received from the field and only JSO can edit it. Until JSO submits the boundary to SSO, SSO will be shown only the name of observer, user id and its current status. After submission, SSO will see two buttons - submit and reject. Similarly, RH will also see two buttons after SSO submits it. Rest of users will only see details about this boundary, and will not be able to edit them.
IV Unit Boundary
In the IV Unit Boundary page, only necessary details are shown. It includes record number, iv unit number, ward numbers, north, east, south, west and details. All other details are hidden.
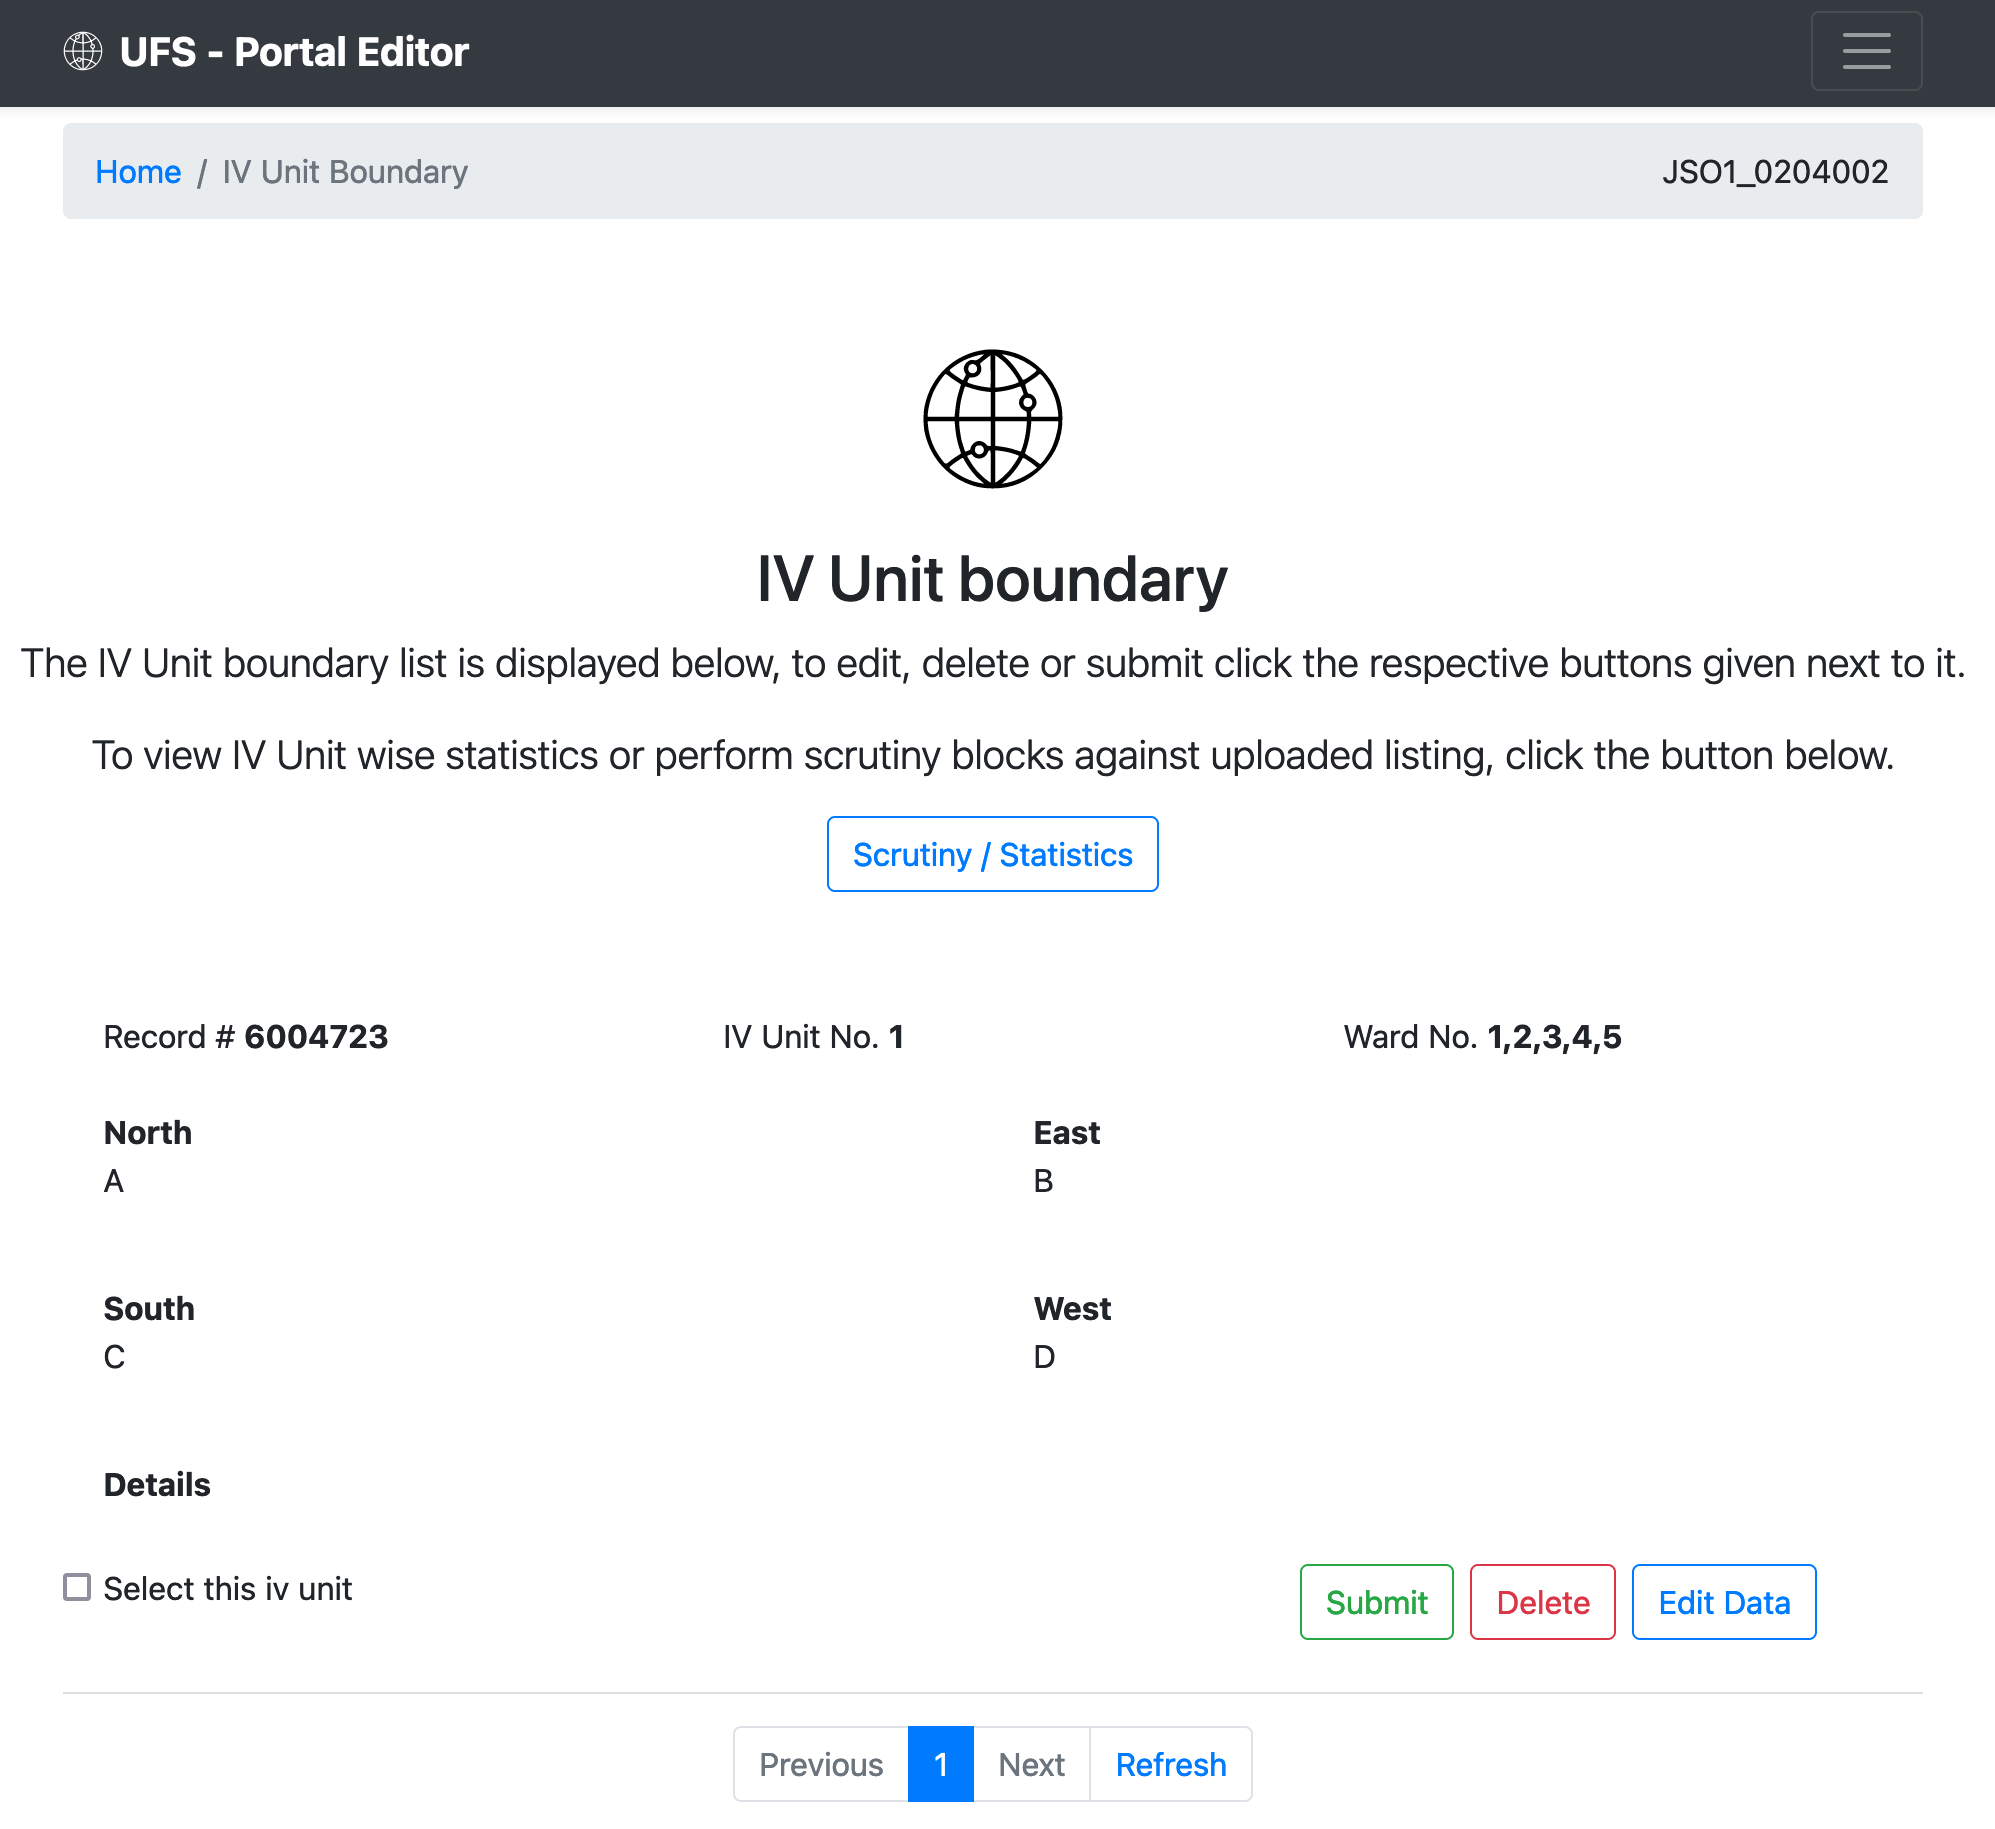
In the screenshot above, the description of iv unit boundary is shown as A, B, C, D with empty details. This is because, the user uploaded the boundary data with the shown values to save time while canvassing the boundary in the field. These values can be edited before submission by clicking the button provided in the respective JSO ID.
Ward Boundary
In the Ward Boundary page, only necessary details are shown. It includes record number, iv unit number, ward number, north, east, south, west and details. All other details are hidden.
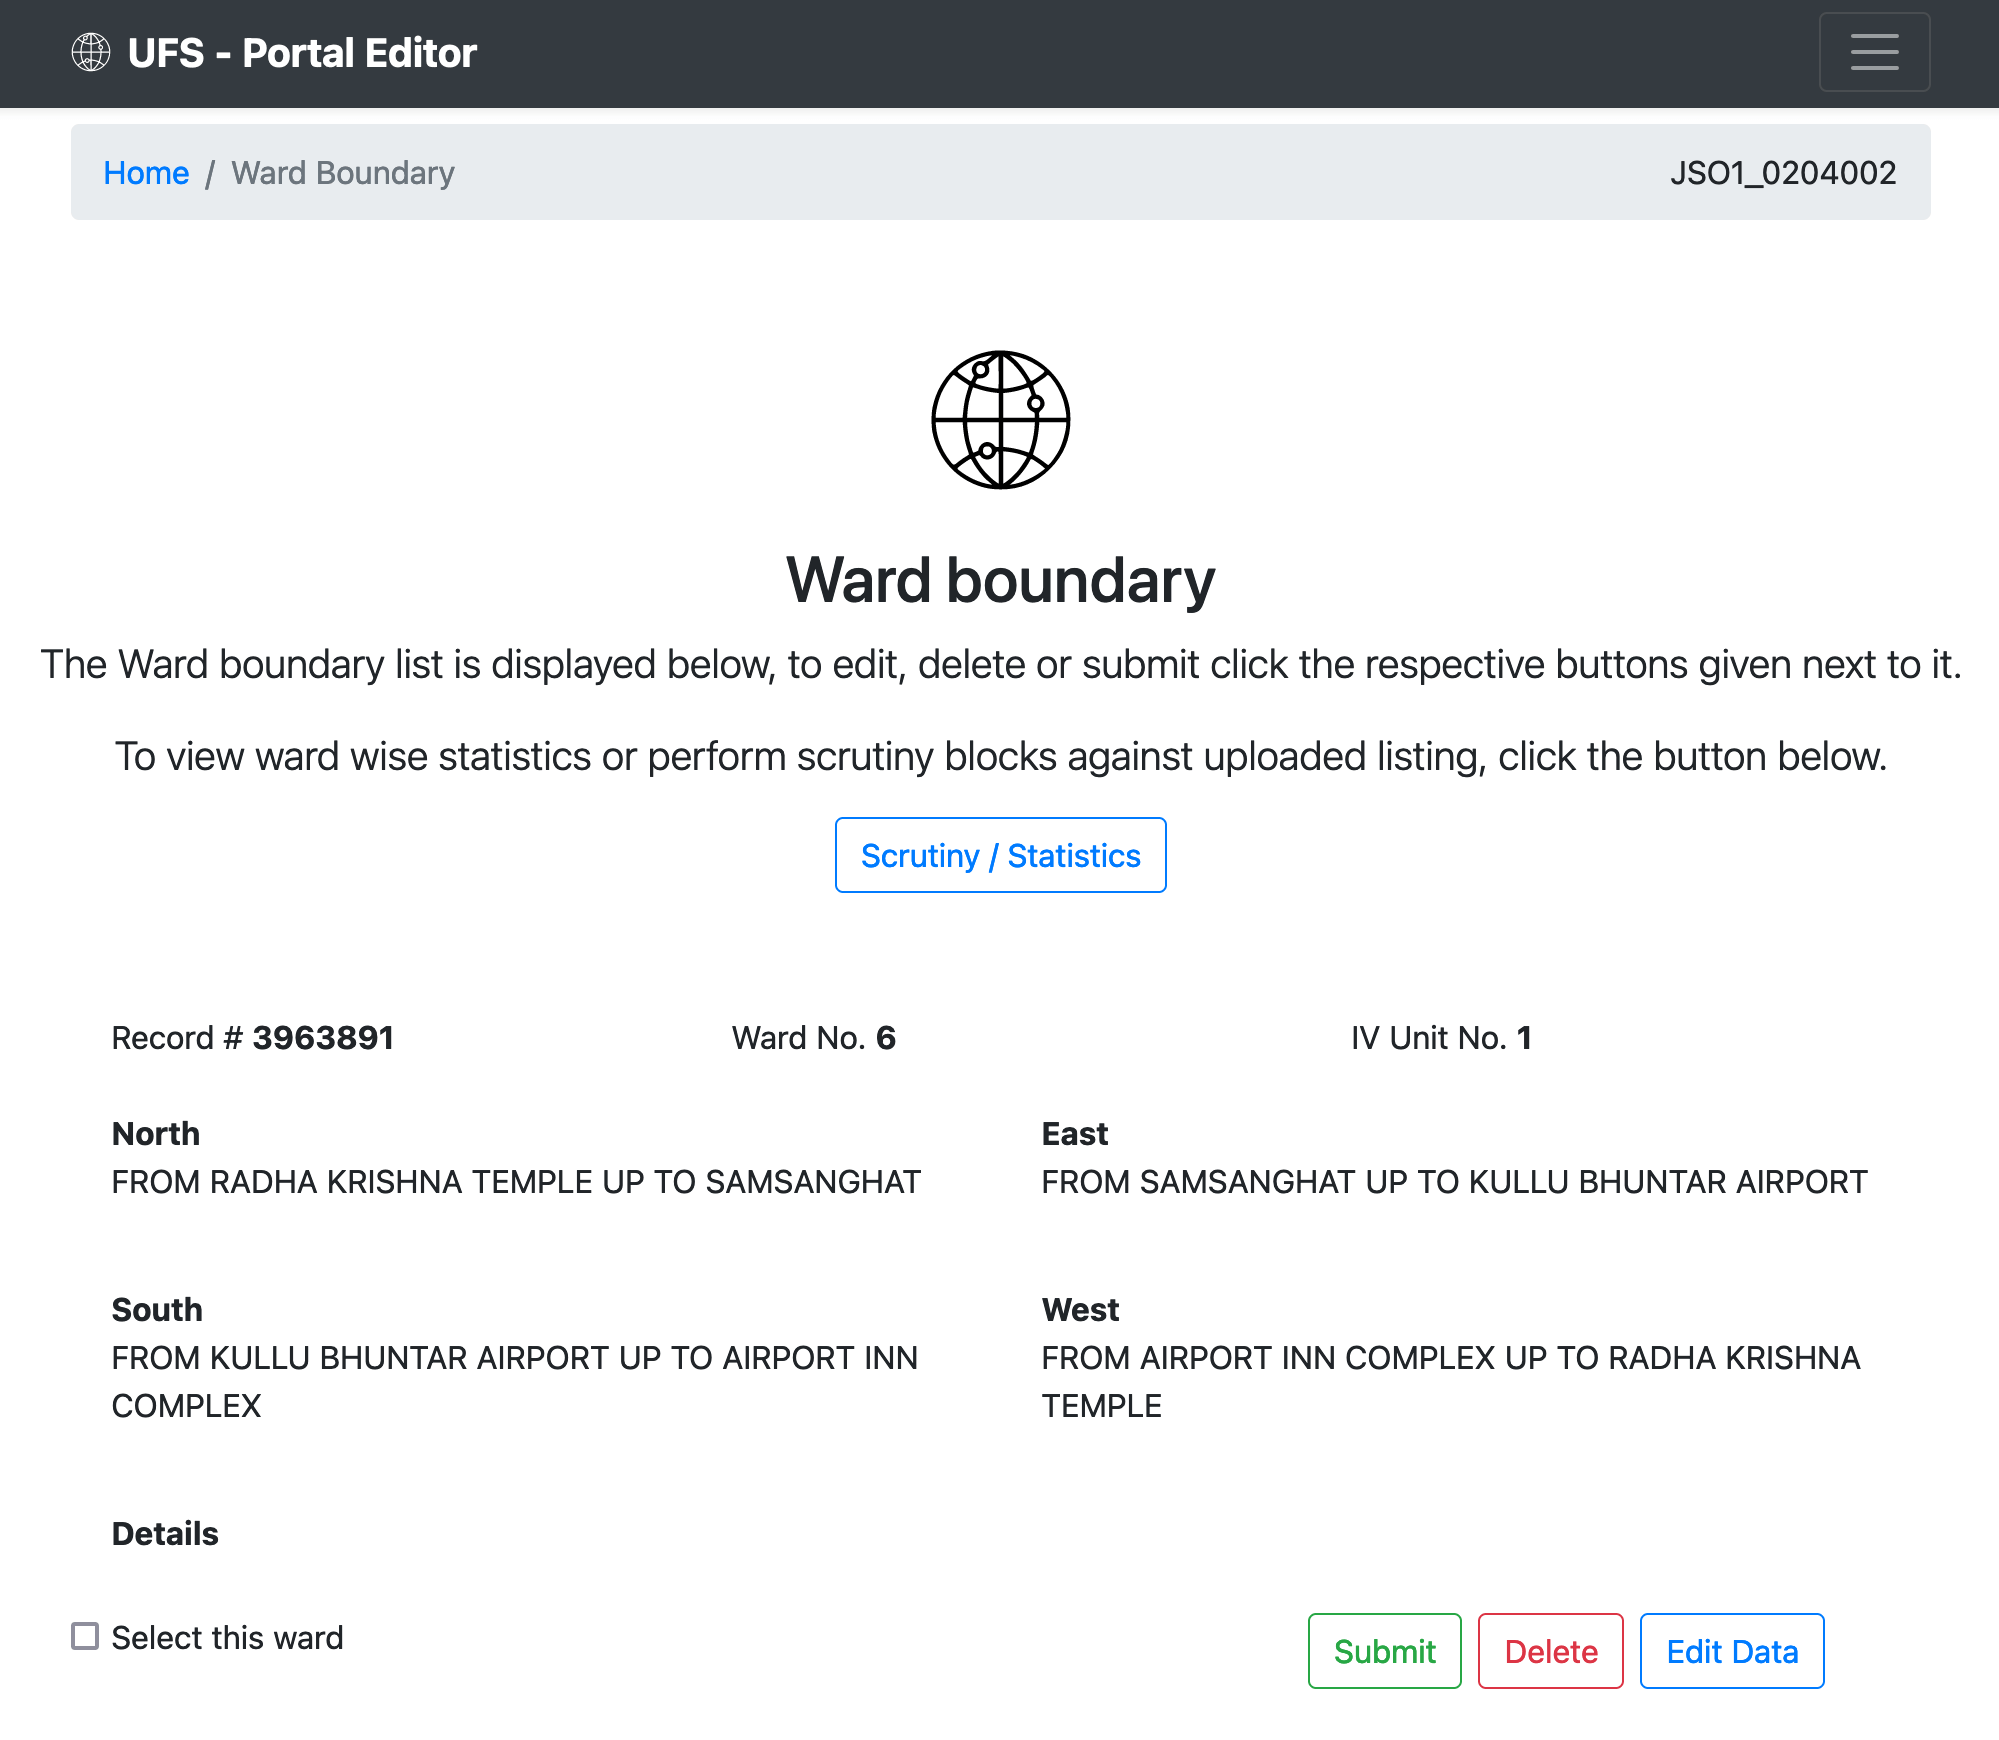
In the screenshot above, a check box is shown with the ward boundary titled Select this ward. Ticking this check box will allow you to select multiple ward boundaries for submitting them at once or even delete multiple ward boundaries at once. However, you will have to confirm the deletion by typing the text provided manually (and copy paste will be disabled for this action). 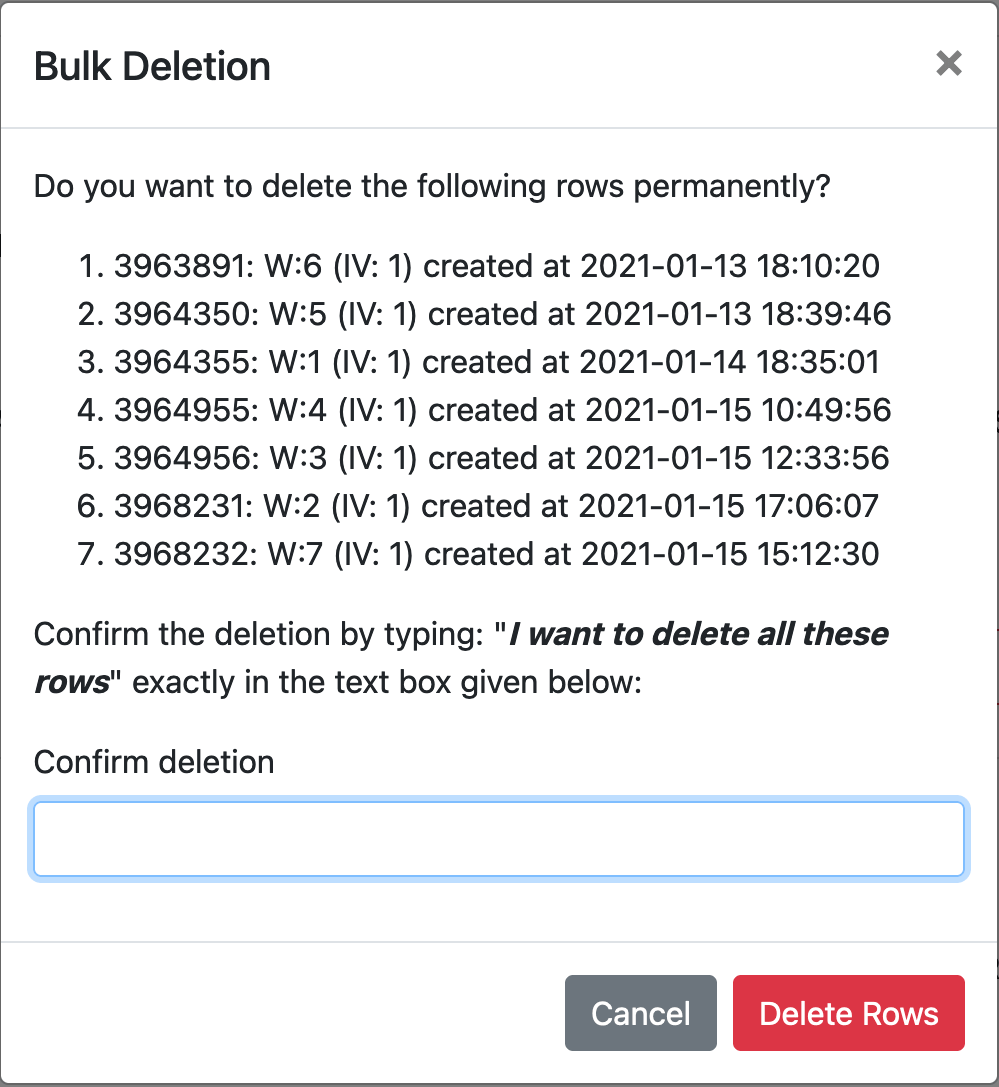
Block Boundary
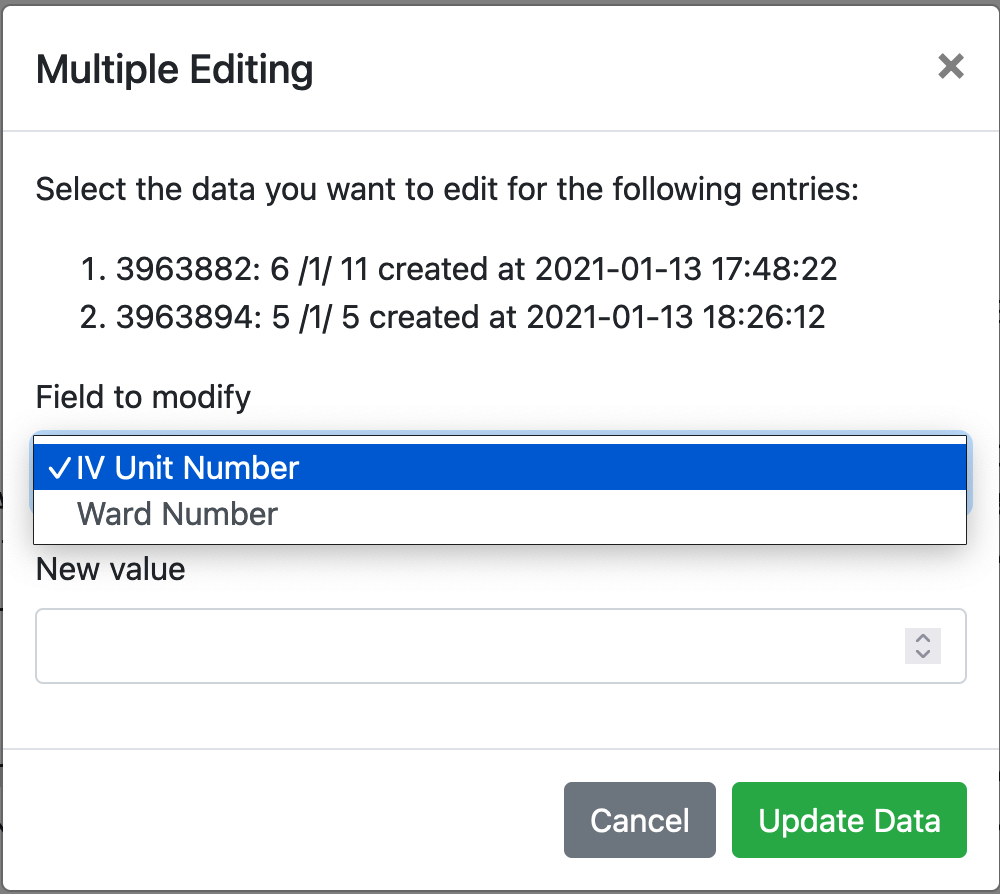
In Block Boundary page, all relevant details regarding the block boundary are shown. It shows record number, block number, iv unit number, ward number, type of area, auxiliary information, north, east, south, west and details. All actions can be performed as it can be done in other pages. Here, you can additionally edit iv unit number and ward number for multiple blocks in one go. Simply select blocks for which the data is to be edited and multiple edit tools will be shown in the right bottom corner and clicking on that button will open a dialog box where you can edit the ward number as well as iv unit number for blocks in one go.
Listing Data
The listing page displays a concise view of all listing data which can be viewed easily without scrolling. It displays multiple values in single column to save space and displays house number, structure name, owner name, details, households, landmark, ward, iv, block, time of capture, record number and action (status if no action is available for current user).
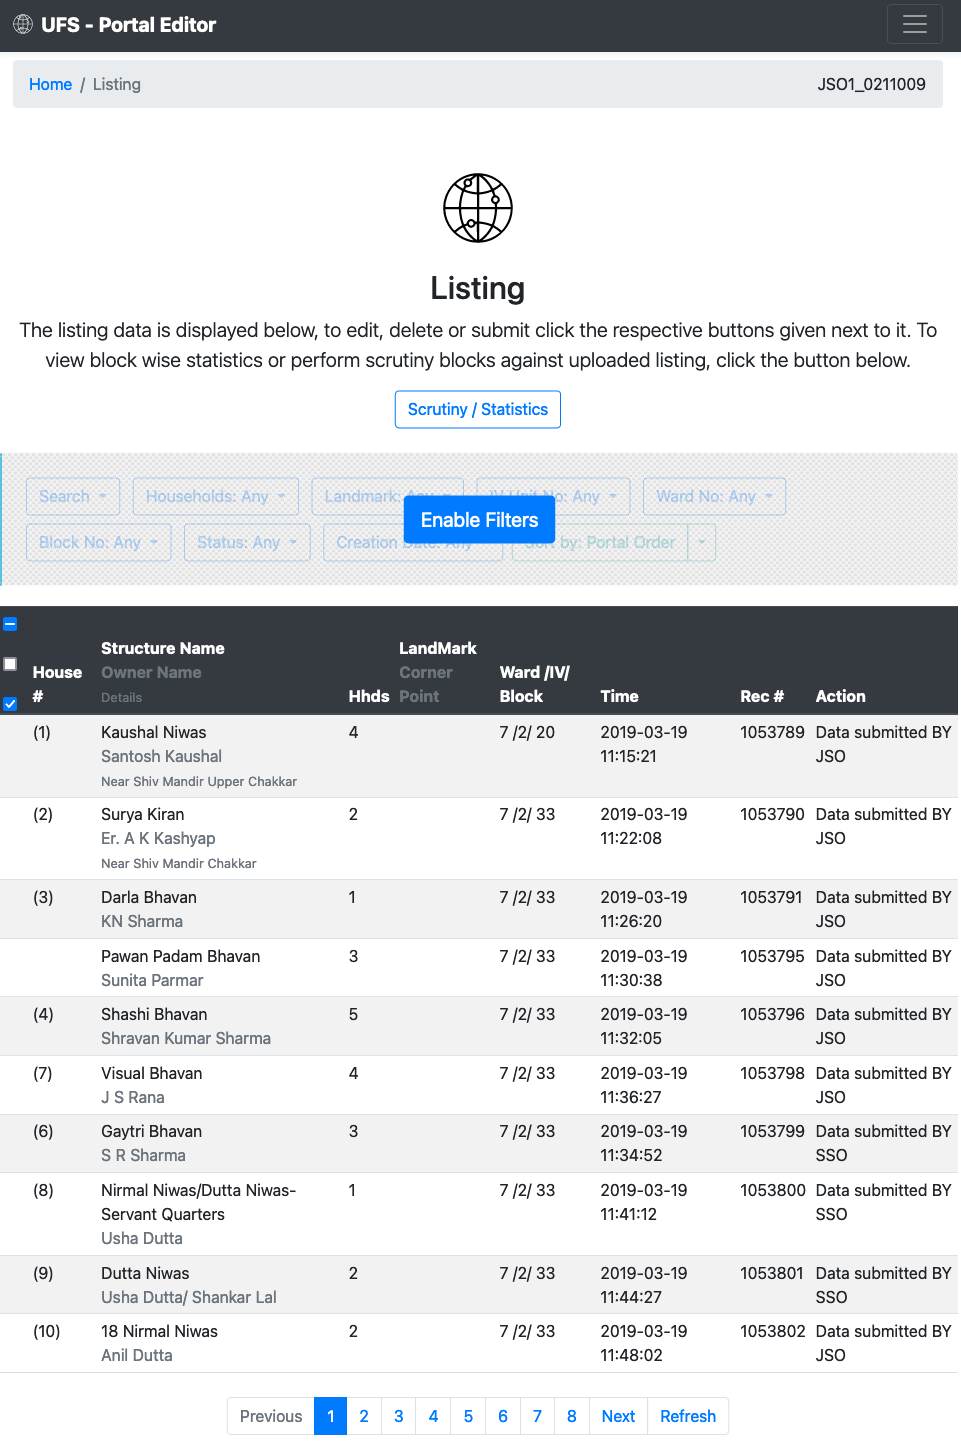
In this page, pagination is shown using which you can go to any page directly. Also, once you load the page, next time it will not be fetched from the server, thus speeding up the process.
Here, you can enable filters for this page using which you can apply filters to view listing for particular block, iv, ward or even based on other criteria like containing few words, range of households, creation time (before, after or between a date range). Also, you can sort the data based on particular parameters. To use this, you will have to enable filters which will fetch all the data from portal and save it to browser cache. And then these filters can be easily used.
Here, you also have multiple edit options using which you can edit block number, ward number, iv unit number and number of households in multiple listing items in a single go. To do so, select multiple items and then the multiple editing tools will pop up and you can use them to modify details for the selected listing items.
To select multiple items, click on the ticked check box displayed in the header of the table. Similarly, the unticked box will uncheck all items and the intermediate checkbox will invert the check boxes. You can select 50 items at a time after enabling filters in this page.
Scrutiny & other features
The portal also supports scrutiny of data and it can be done with all IDs. Each ID has access to list of blocks, wards and listing. And on those pages, there is a link to open the statistics page (also called as scrutiny page). Open it to view the further process for performing scrutiny and other features.
Summary of Data
Using this page, you can see a summary of data available in this ID. All blocks, wards and IV units are shown in their respective tables. This page enables you to see where you might have wrongly entered a different block number, iv unit number, ward number or any other detail. As each block number is shown in its own row having unique combination of ward number, block number and iv unit number. So, for one entry having different data for any one detail will stand out and could be identified easily. It can also be rectified directly using this page.
You may get a dialog upon opening the page saying that partial data was found. To view all the data, click the Load All button. It will download all the data for this ID including IV Unit Boundary, Ward Boundary, Block Boundary and Listing data available on the portal. After all the data gets loaded, you will be able to utilize the full potential of this webpage.
If you think that there is some mismatched values are being displayed, check the type of inconsistencies that may exist in your data. Spot them and remove them to see the corrected summary.
A summary is displayed for each unique block number combination, each ward number and each IV unit number. It also displays the record number of the boundary (if uploaded) along with total households, timing details and total blocks for ward and iv units. It also has a few buttons displayed in front of each row - change, scrutiny and UFSL scrutiny.
The change button can be used to bulk edit listing and blocks with the new data. For example, if you want to change Ward number 18 to 8 in all listing items and block items, you can use the change button and enter 8 as the new value. And this will update all the relevant data items with the new data instantly.
Scrutiny button can be used to scrutinize the data uploaded on the portal using the Bhuvan app. This option will allow you to check the uploaded listing against the block, ward and iv unit boundary. If the given block does not have any entry uploaded in portal, it will show the scrutiny ufsl button instead.
The portal treats numbers as strings. For example, block numbers 001 and 1 - will be treated as two different blocks. And both of these will show as separate items. And to merge them, you need to change one to be shown as single item.
UFSL scrutiny button will open the scrutiny tool using which you can scrutiny UFSL data against the boundary uploaded in the portal. More details regarding this can be seen in the UFSL Manual.
Download boundary description in Excel Format
The download button is given in the statistics page, using which you can download all the boundary description in a single excel file. The download excel file will contain all the boundary descriptions for block boundaries, ward boundary, iv unit boundary and town boundary also. Only the relevant fields will be shown in the excel file. Also, all the downloaded data will be shown in printable format i.e. all auxiliary information compressed into one column, all type of area codes shown in single column and similarly all identification details like record number, block number etc are also shown in single column.
Check record numbers from QGIS
Using this feature, you can cross verify the record numbers entered in QGIS with the record numbers available in the portal. There are three methods to verify the record numbers as shown in the dialog box:
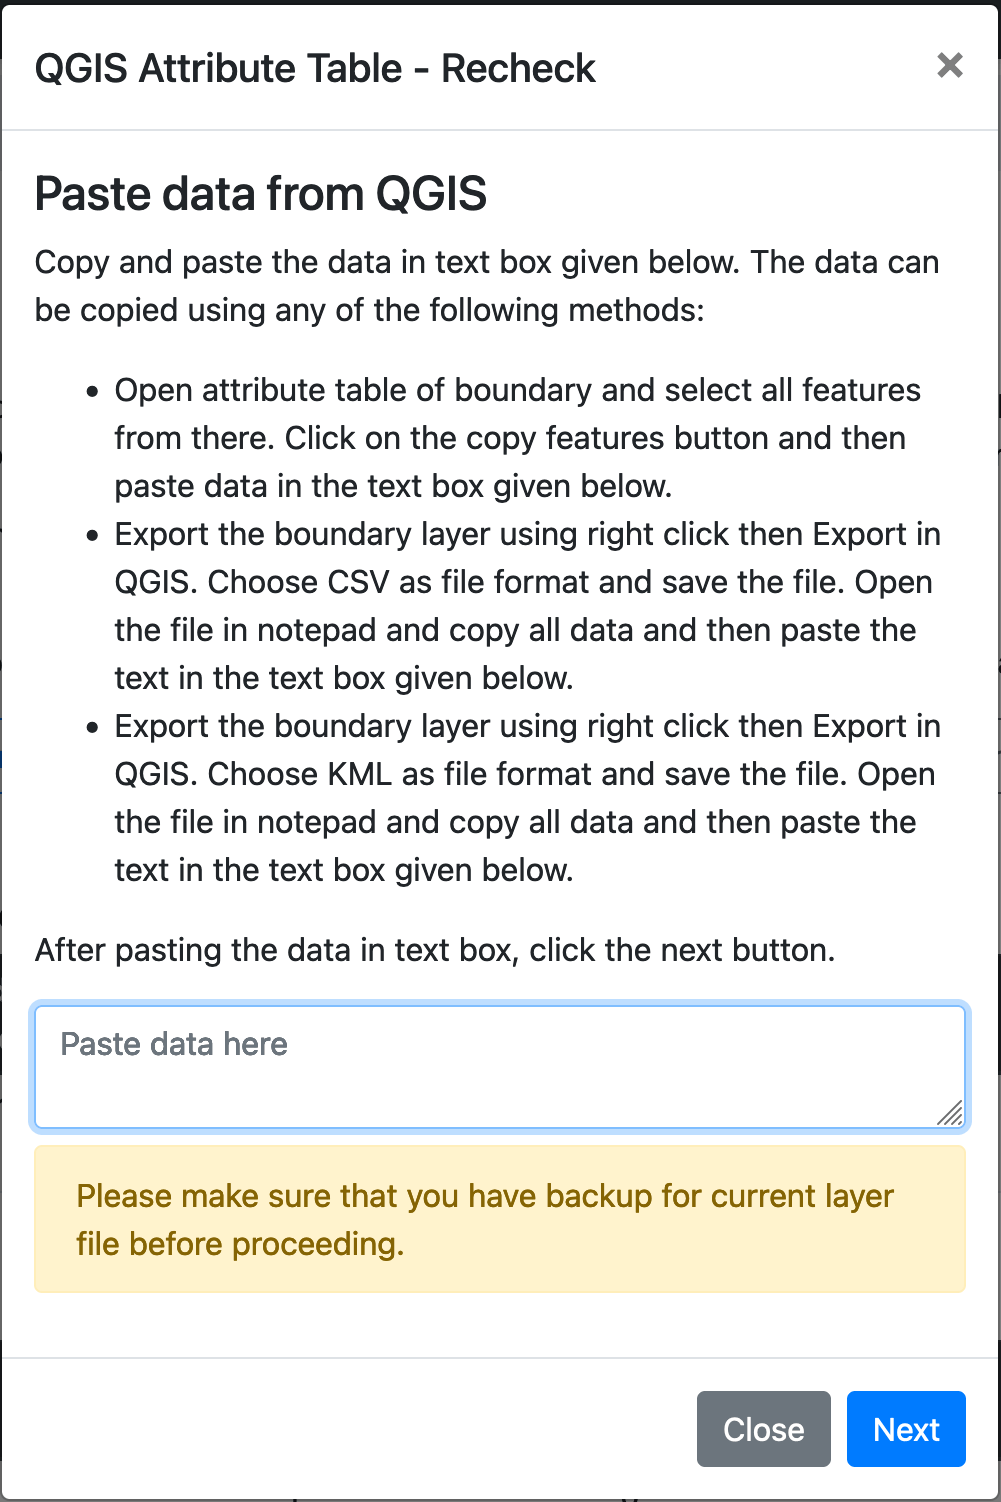
This will not only check for the record numbers but also give you option to replace them with correct record numbers if found incorrect. The features with the corrected record numbers will be available in the clipboard after replacement. (The auto-correction feature is available only in QGIS features copied to clipboard).
Scrutinizing data
The scrutiny tool can be accessed using the scrutiny button given next to the block boundary. On clicking the button, you will see a page similar to the one shown below:
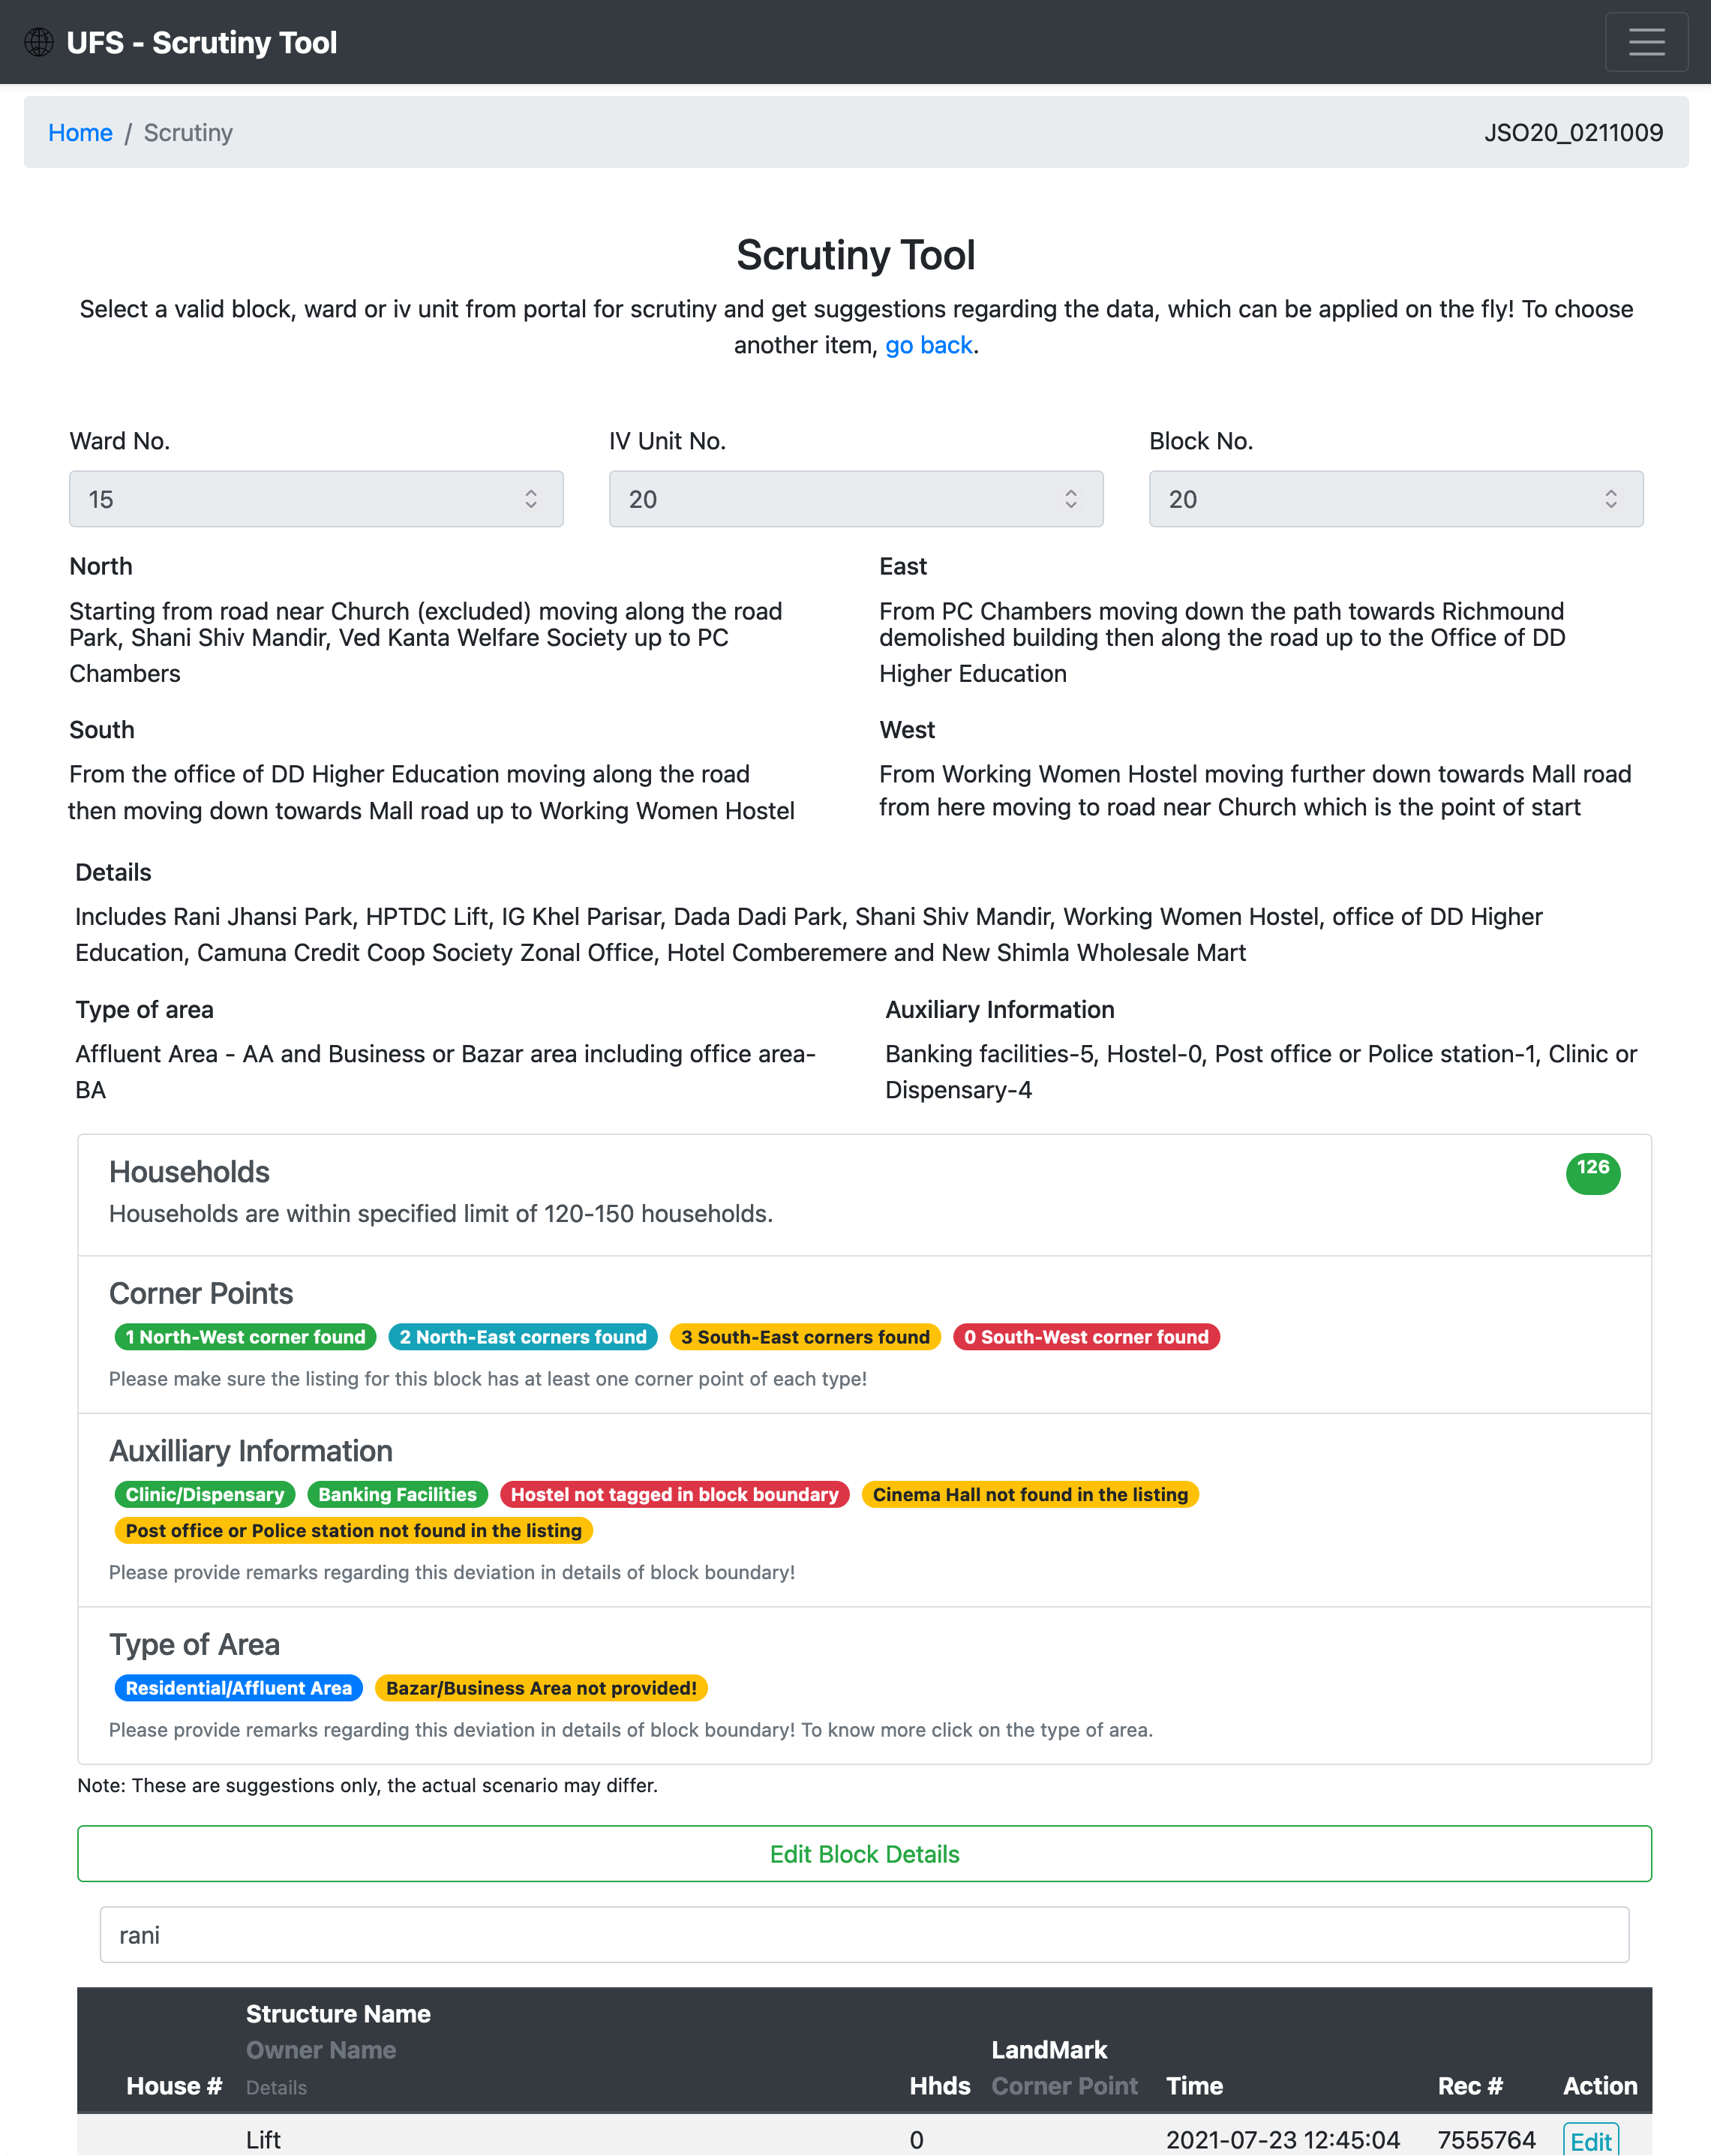
Here, the basic details about the block is shown i.e. ward number, iv unit number, block number, north, west, south, east and details. It also includes the type of area and auxiliary information for the block.
Below these details you can see the four checks that have been integrated in the tool: number of households falling in given range or not, number of corner points available in the listing, auxiliary information - whether it matches the listing and also if the listing matches the auxiliary information and finally type of area code. These checks will help you to find and remove all the inconsistencies across different parameters.
You can also edit the block details right from this page by clicking the Edit Block details button below these checks. You can also search for buildings mentioned above in the boundary description using the search box to see if they are present in listing or not. Further, each structure is checked against landmark types and will give you hints regarding if any building qualifies for a landmark and has not been given any. Reverse will also be shown i.e. if the building is tagged with a landmark, but it seems if the landmark might have been possibly tagged wrong, it will show a sign next to the entry. Also, you can edit the listing data with the edit button displayed to each listing entry.
So, to scrutinize a block, the following steps are to be followed:
- Open the block for scrutiny after loading all the data in the statistics page.
- First of all, check if the ending point of north description is the starting point of east description; the ending of east description is the starting of south; the ending of south is starting point of west description and similarly the ending of west is the starting point of the block i.e. the north west corner of the block.
- Next, you need to check if the buildings mentioned in the north, east, south, west and details are actually present in the listing (and not present for buildings which have been excluded)
- Next check if all the building listed have been properly checked for missing landmarks (and no building has been accidentally tagged wrongly)
- Next, check if the listing falls within the criteria of 120-150 households (if not mention the reason in details about this deviation)
- Then, check if the block has been provided with corner points as indicated (provide remarks for any deviation)
- Auxiliary information should be checked next to see if no auxiliary information has been left out and no extra auxiliary information has been added as per suggestions given
- Type of area should be checked as well. But one thing to note here is that the hints provided for this field are merely suggestions, and the actual scenario may differ. Just check if you have tagged the type of area correctly, if there seems to be any deviation between the suggested and entered values.
Each suggestion has been color coded based on the strength it represents. For a green color, it means that every thing is okay, while blue means that check once that you have entered correctly. While orange means there might be some mistake and red stands for a mistake in the data, and needs to be rectified.
Regional Dictionary
This feature allows you to use synonyms of landmarks and other relevant auxiliary information for classification of listing data. Based on the words you define in the dictionary, you will be shown suggestions for marking them with given landmark.
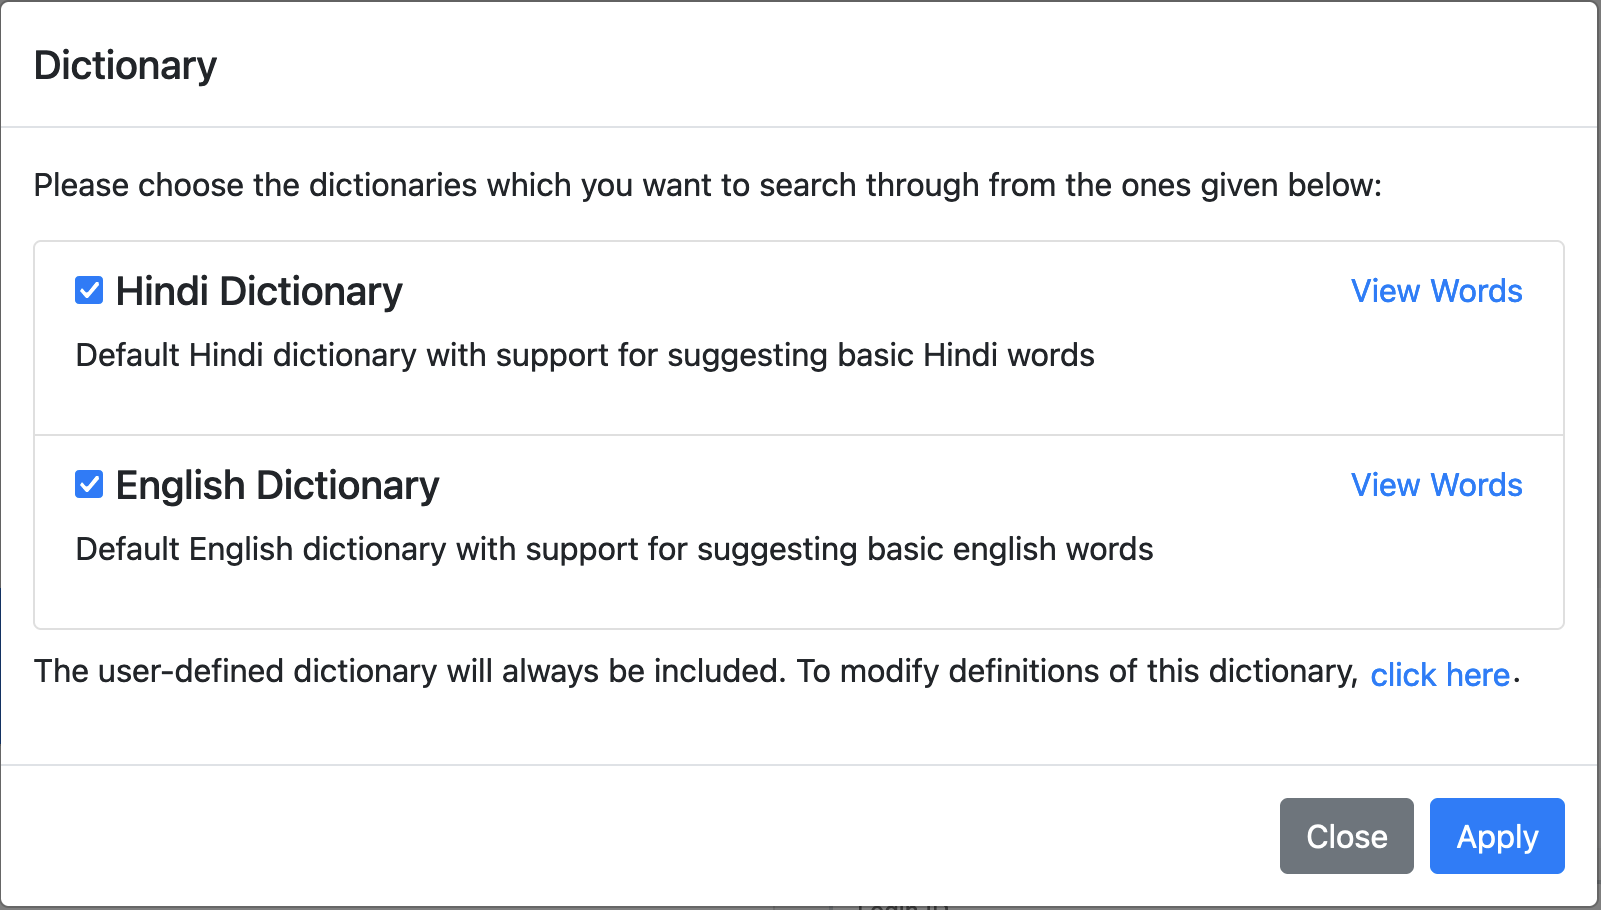
By default, two dictionaries are already added: English and Hindi. You are free to add more words to your own dictionary using the instructions given in the dictionary dialog itself. All your words will be saved in your current window only.
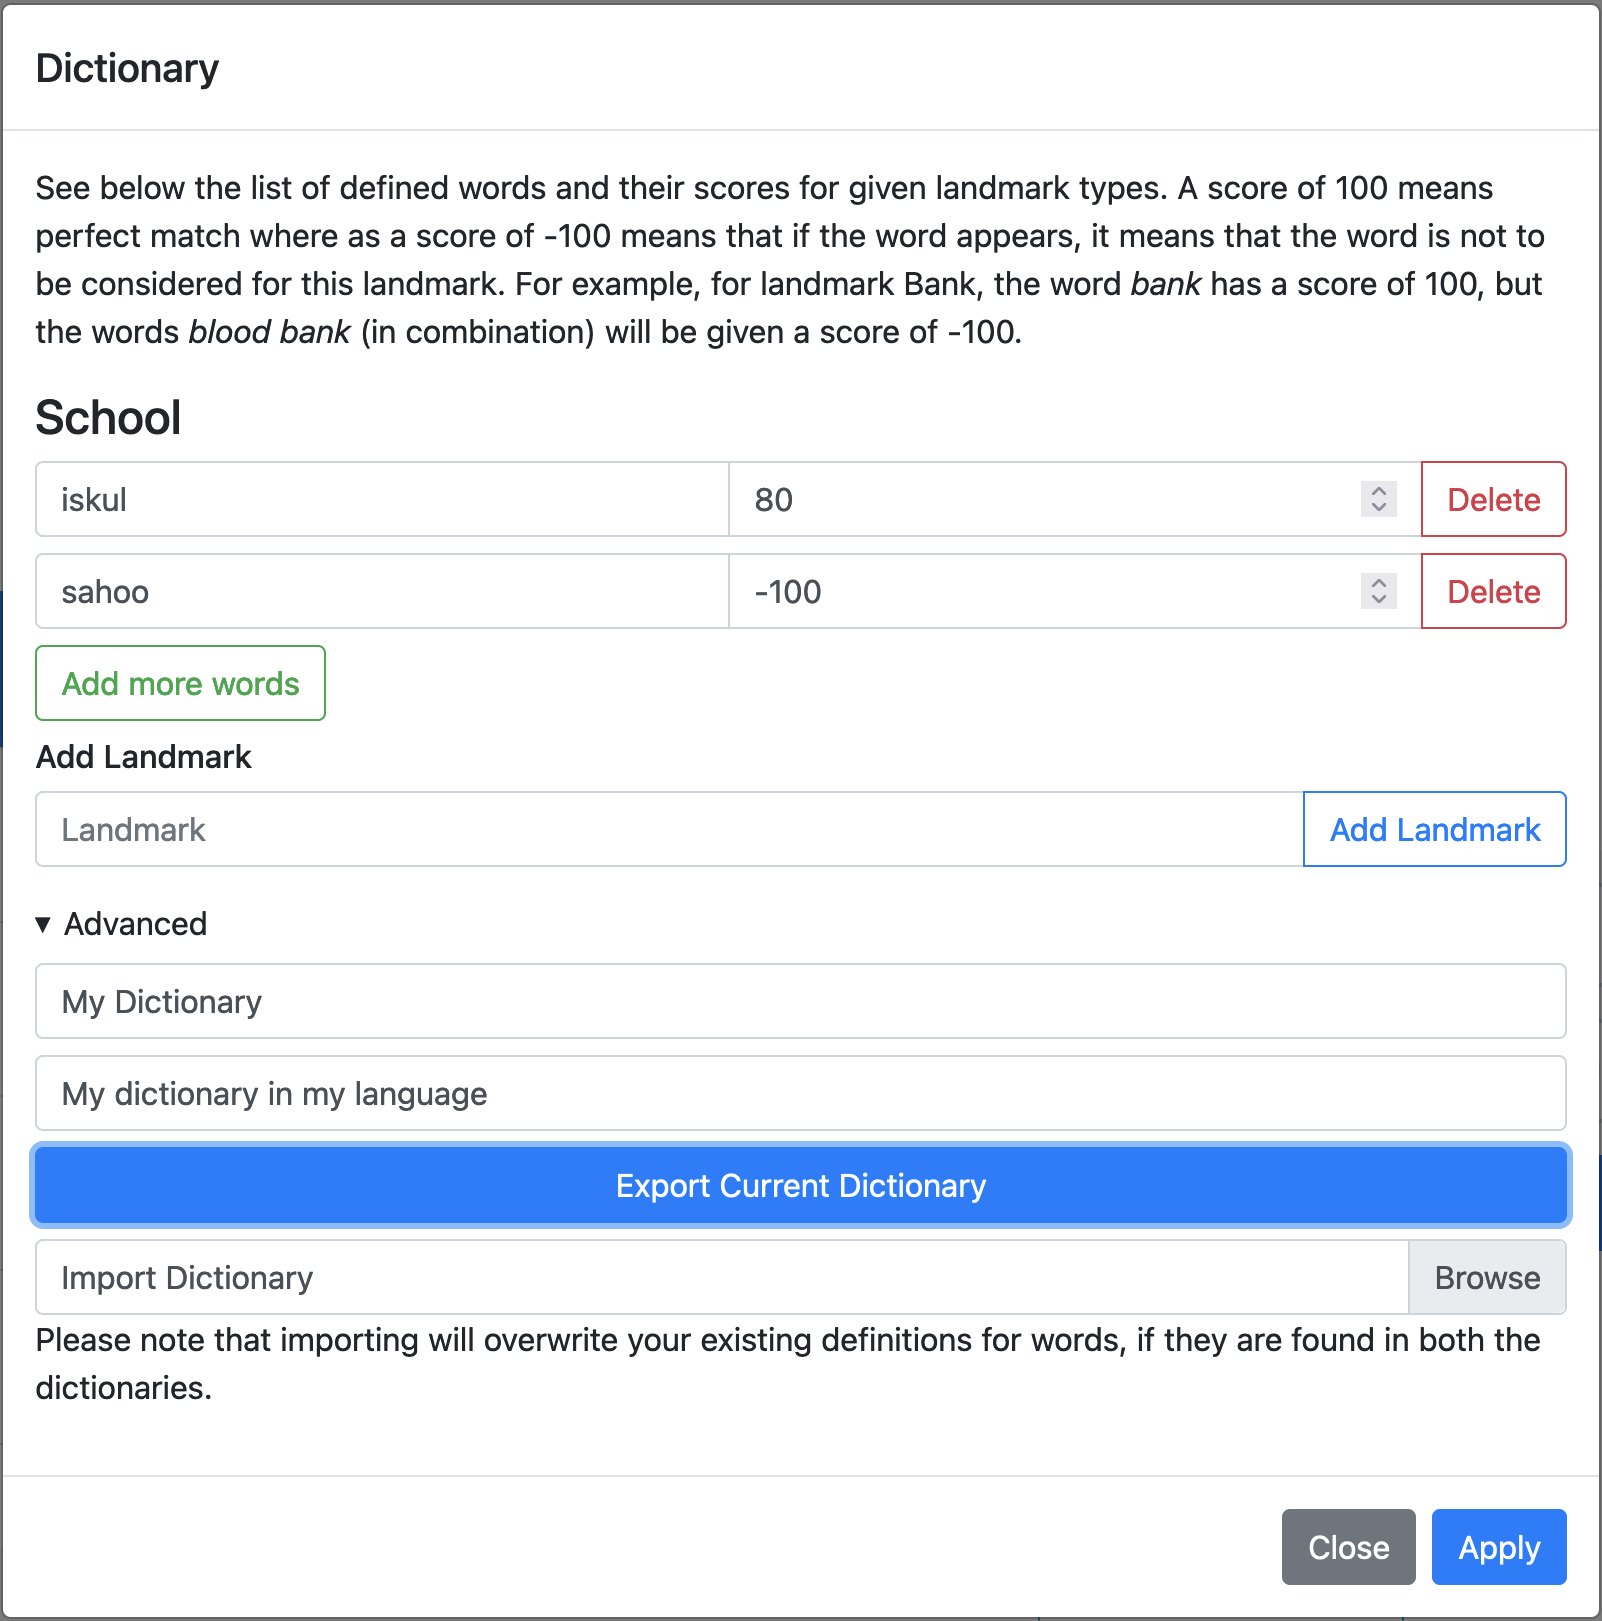
You can export the dictionary for sharing and use on multiple computers using the in built buttons.
Special Procedure
Some methods are shown here to demonstrate the usage of this tool and the ease with which these tasks can be done.
Changing block number
Consider a scenario where a user while uploading the data mistakenly entered the same block number for two wards. In the normal portal, you will be limited to edit the block number based on iv unit number and block number pair. But, here you will see the technique to edit block number for separation.
The first step involves identifying the mistake. This can be easily done with to tool by visiting the statistics page. When it is clear that there is no way to edit such a detail directly, the only way is to edit the entries manually.
So, before you start, make a note of all three fields: ward number, iv unit number and block number.
Now, head over to listing page and make sure that filters are enabled. Then select the ward number, iv unit number and block number of the block whose block number is to be changed. Now, you will be shown only the selected listing.
Now, select all the listing by clicking the ticked check box in the table header. Then in multiple edit options, select edit option and choose block number in the dialog box that opens and enter the new block number.
Then click on proceed and the tool will start to update the block number of all selected listing entries by itself. You will have to repeat these steps for all the pages of listing that belong to this block.
After this is done, you can proceed to edit the block boundary to its correct number and the statistics page will now show them as two separate blocks.
Merging IV Units
If there are multiple IV Units that need to be merged into a single IV unit, you can follow this procedure. It may be required if number of blocks turned out to be lesser than expected, and they do not cross the required 40 mark even after combining total blocks of both IVs.
Doing this is expected to change the final numbering of the blocks in each IV, so first of all we will need to assign unique dummy block numbers to all blocks in both the IVs.
So, let's assume that we have two IVs with three blocks each and we need to merge these two IVs. Consider the details given below in the table:
| # | IV Unit | Old Block Number | Dummy Block Number | New IV Unit | New Block Number |
|---|---|---|---|---|---|
| 1 | 21 | 1 | |||
| 2 | 21 | 2 | |||
| 3 | 21 | 3 | |||
| 4 | 22 | 1 | |||
| 5 | 22 | 2 | |||
| 6 | 22 | 3 |
To change the block numbers, use the change button displayed next to the block numbers. So, we will change the block numbers into dummy numbers first for each block one by one. So, for block 1 in IV 21 will be changed to 2101, block 2 in IV 21 will be changed to 2102 and so on.
| # | IV Unit | Old Block Number | Dummy Block Number | New IV Unit | New Block Number |
|---|---|---|---|---|---|
| 1 | 21 | 1 | 2101 | ||
| 2 | 21 | 2 | 2102 | ||
| 3 | 21 | 3 | 2103 | ||
| 4 | 22 | 1 | 2201 | ||
| 5 | 22 | 2 | 2202 | ||
| 6 | 22 | 3 | 2203 |
Now, we have changed all the block numbers to dummy block numbers, now we need to make a single IV for both of these IVs. For changing this, we will go to the IV Unit table and click on the change button next to the IV 22 (you may choose any) and enter the new IV Unit number as 21.
Changing IV unit numbers this way needs to be done with caution, as once the IV gets merged it may become very difficult to separate them again.
| # | IV Unit | Old Block Number | Dummy Block Number | New IV Unit | New Block Number |
|---|---|---|---|---|---|
| 1 | 21 | 1 | 2101 | 21 | |
| 2 | 21 | 2 | 2102 | 21 | |
| 3 | 21 | 3 | 2103 | 21 | |
| 4 | 22 | 1 | 2201 | 21 | |
| 5 | 22 | 2 | 2202 | 21 | |
| 6 | 22 | 3 | 2203 | 21 |
Now, both IVs have the same IV unit number. So, next we need to assign them final block numbers. To do so, we will click on the change button next to each block and assign them their final block number.
| # | IV Unit | Old Block Number | Dummy Block Number | New IV Unit | New Block Number |
|---|---|---|---|---|---|
| 1 | 21 | 1 | 2101 | 21 | 4 |
| 2 | 21 | 2 | 2102 | 21 | 2 |
| 3 | 21 | 3 | 2103 | 21 | 1 |
| 4 | 22 | 1 | 2201 | 21 | 3 |
| 5 | 22 | 2 | 2202 | 21 | 5 |
| 6 | 22 | 3 | 2203 | 21 | 6 |
So, finally we have merged the two IVs and each block has same IV number and unique block number.
Splitting IV Units
Splitting IV Units is more difficult than it is to merge IV units. This requires a lot of work as well as attention. The procedure is however, straight forward. The approach to be adopted for this is similar to one adopted in the merging of IVs. As we will assign the blocks dummy number then we will change the IV Unit and finally assign them their final unique block numbers.
| # | IV Unit | Old Block Number | Dummy Block Number | New IV Unit | New Block Number |
|---|---|---|---|---|---|
| 1 | 21 | 1 | |||
| 2 | 21 | 2 | |||
| 3 | 21 | 3 | |||
| 4 | 21 | 4 | |||
| 5 | 21 | 5 | |||
| 6 | 21 | 6 |
In the table above, we need to split the IV 21 into two IVs. Now, we will assume that block number 1, 2 and 4 are to be kept in IV 21 while 3, 5 and 6 are to be carved out into new IV unit number 22. So, we will assign them dummy block numbers - 2101, 2102, 2103, 2201, 2202 and 2203 respectively. So, click on the change button and assign the blocks dummy numbers.
| # | IV Unit | Old Block Number | Dummy Block Number | New IV Unit | New Block Number |
|---|---|---|---|---|---|
| 1 | 21 | 1 | 2101 | ||
| 2 | 21 | 2 | 2102 | ||
| 3 | 21 | 3 | 2201 | ||
| 4 | 21 | 4 | 2103 | ||
| 5 | 21 | 5 | 2202 | ||
| 6 | 21 | 6 | 2203 |
Now, that we have assigned them dummy numbers, we next need to change their IV Unit numbers. Since there is no shortcut method to change this, we will head over to the listing page first.
You can use the checkboxes below the apply button in listing page to select or deselect all blocks in one click. Similarly, all listing can be selected on current page by clicking the checked check box in the table header where all listing is displayed.
In the listing page, we will select from the filters blocks belonging to the new IV 22. So, we will select block numbers - 2201, 2202 and 2203 and deselect all others and then click on apply button. Now, we will see only the listing of these blocks. So we will select all the listing shown and click on multiple editing options and choose the edit option. Then we will select IV Unit number in the dialog box and enter the new value as 22. Then apply to change the IV Unit number. We will need to do this for each page until there is none left.
We need to do this procedure for one IV unit only, as the other IV unit can be changed directly from the statistics page after one IV unit has been changed into new IV Unit. For example, if in above case the new IV Unit numbers were 22 and 25, then we would need to change for 22 first and when all the required changes have been done, we could use the statistics page to change the IV Unit number of IV Unit 21 to 25 in one click.
After all the required listing has been changed into new IV Unit number, we will need to change the IV Unit number in the block boundary page as well. Head over to the block boundary page and select multiple blocks and change their IV Unit number to 22. Do this for all the blocks that belong to the new IV Unit number.
| # | IV Unit | Old Block Number | Dummy Block Number | New IV Unit | New Block Number |
|---|---|---|---|---|---|
| 1 | 21 | 1 | 2101 | 21 | |
| 2 | 21 | 2 | 2102 | 21 | |
| 3 | 21 | 3 | 2201 | 22 | |
| 4 | 21 | 4 | 2103 | 21 | |
| 5 | 21 | 5 | 2202 | 22 | |
| 6 | 21 | 6 | 2203 | 22 |
Now, that all the block numbers and listing has been changed to new IV Unit number, we need to assign the final block numbers to these blocks. To change this, click on the button displayed next to each block and assign them their new block numbers.
| # | IV Unit | Old Block Number | Dummy Block Number | New IV Unit | New Block Number |
|---|---|---|---|---|---|
| 1 | 21 | 1 | 2101 | 21 | 3 |
| 2 | 21 | 2 | 2102 | 21 | 2 |
| 3 | 21 | 3 | 2201 | 22 | 1 |
| 4 | 21 | 4 | 2103 | 21 | 1 |
| 5 | 21 | 5 | 2202 | 22 | 2 |
| 6 | 21 | 6 | 2203 | 22 | 3 |
So, the splitting of one IV Unit into two IV units has been completed successfully!
Finalizing Tool
Due to existence of multiple apps for listing work, some data is present in UFSL format while rest of data is available in the portal. Generation of schedules using the original portal is currently not possible for such cases. Here, using this tool you will not only be able to scrutiny the data but also finalize it in the form of schedules.
The tool supports finalization and scrutiny of towns completed using any combination of the two apps i.e. it will support town completed wholly in Bhuvan app, and also support town completed partially in UFSL app and the rest in Bhuvan app.
Supported Files
The tool accepts the files download from the original portal by going into the table view of each item viz. town boundary, iv unit boundary, ward boundary, block boundary and listing; and then downloading the files using the export button.
It also accepts the merged files generated using the merge tool (user manual) for a single town (or even individual files for each block).
The tool will work only if you have all the data available for the town including the UFSL data (if any) and all the exported files from the portal.
You may also use the alternate portal tool to generate the files for the town as a single excel file. Head over to the statistics page after logging in the portal and then downloading the Excel file from there. This fill will contain data for all four boundaries - town, ward, iv unit and block. And this can be uploaded in this tool to load all the boundaries at once.
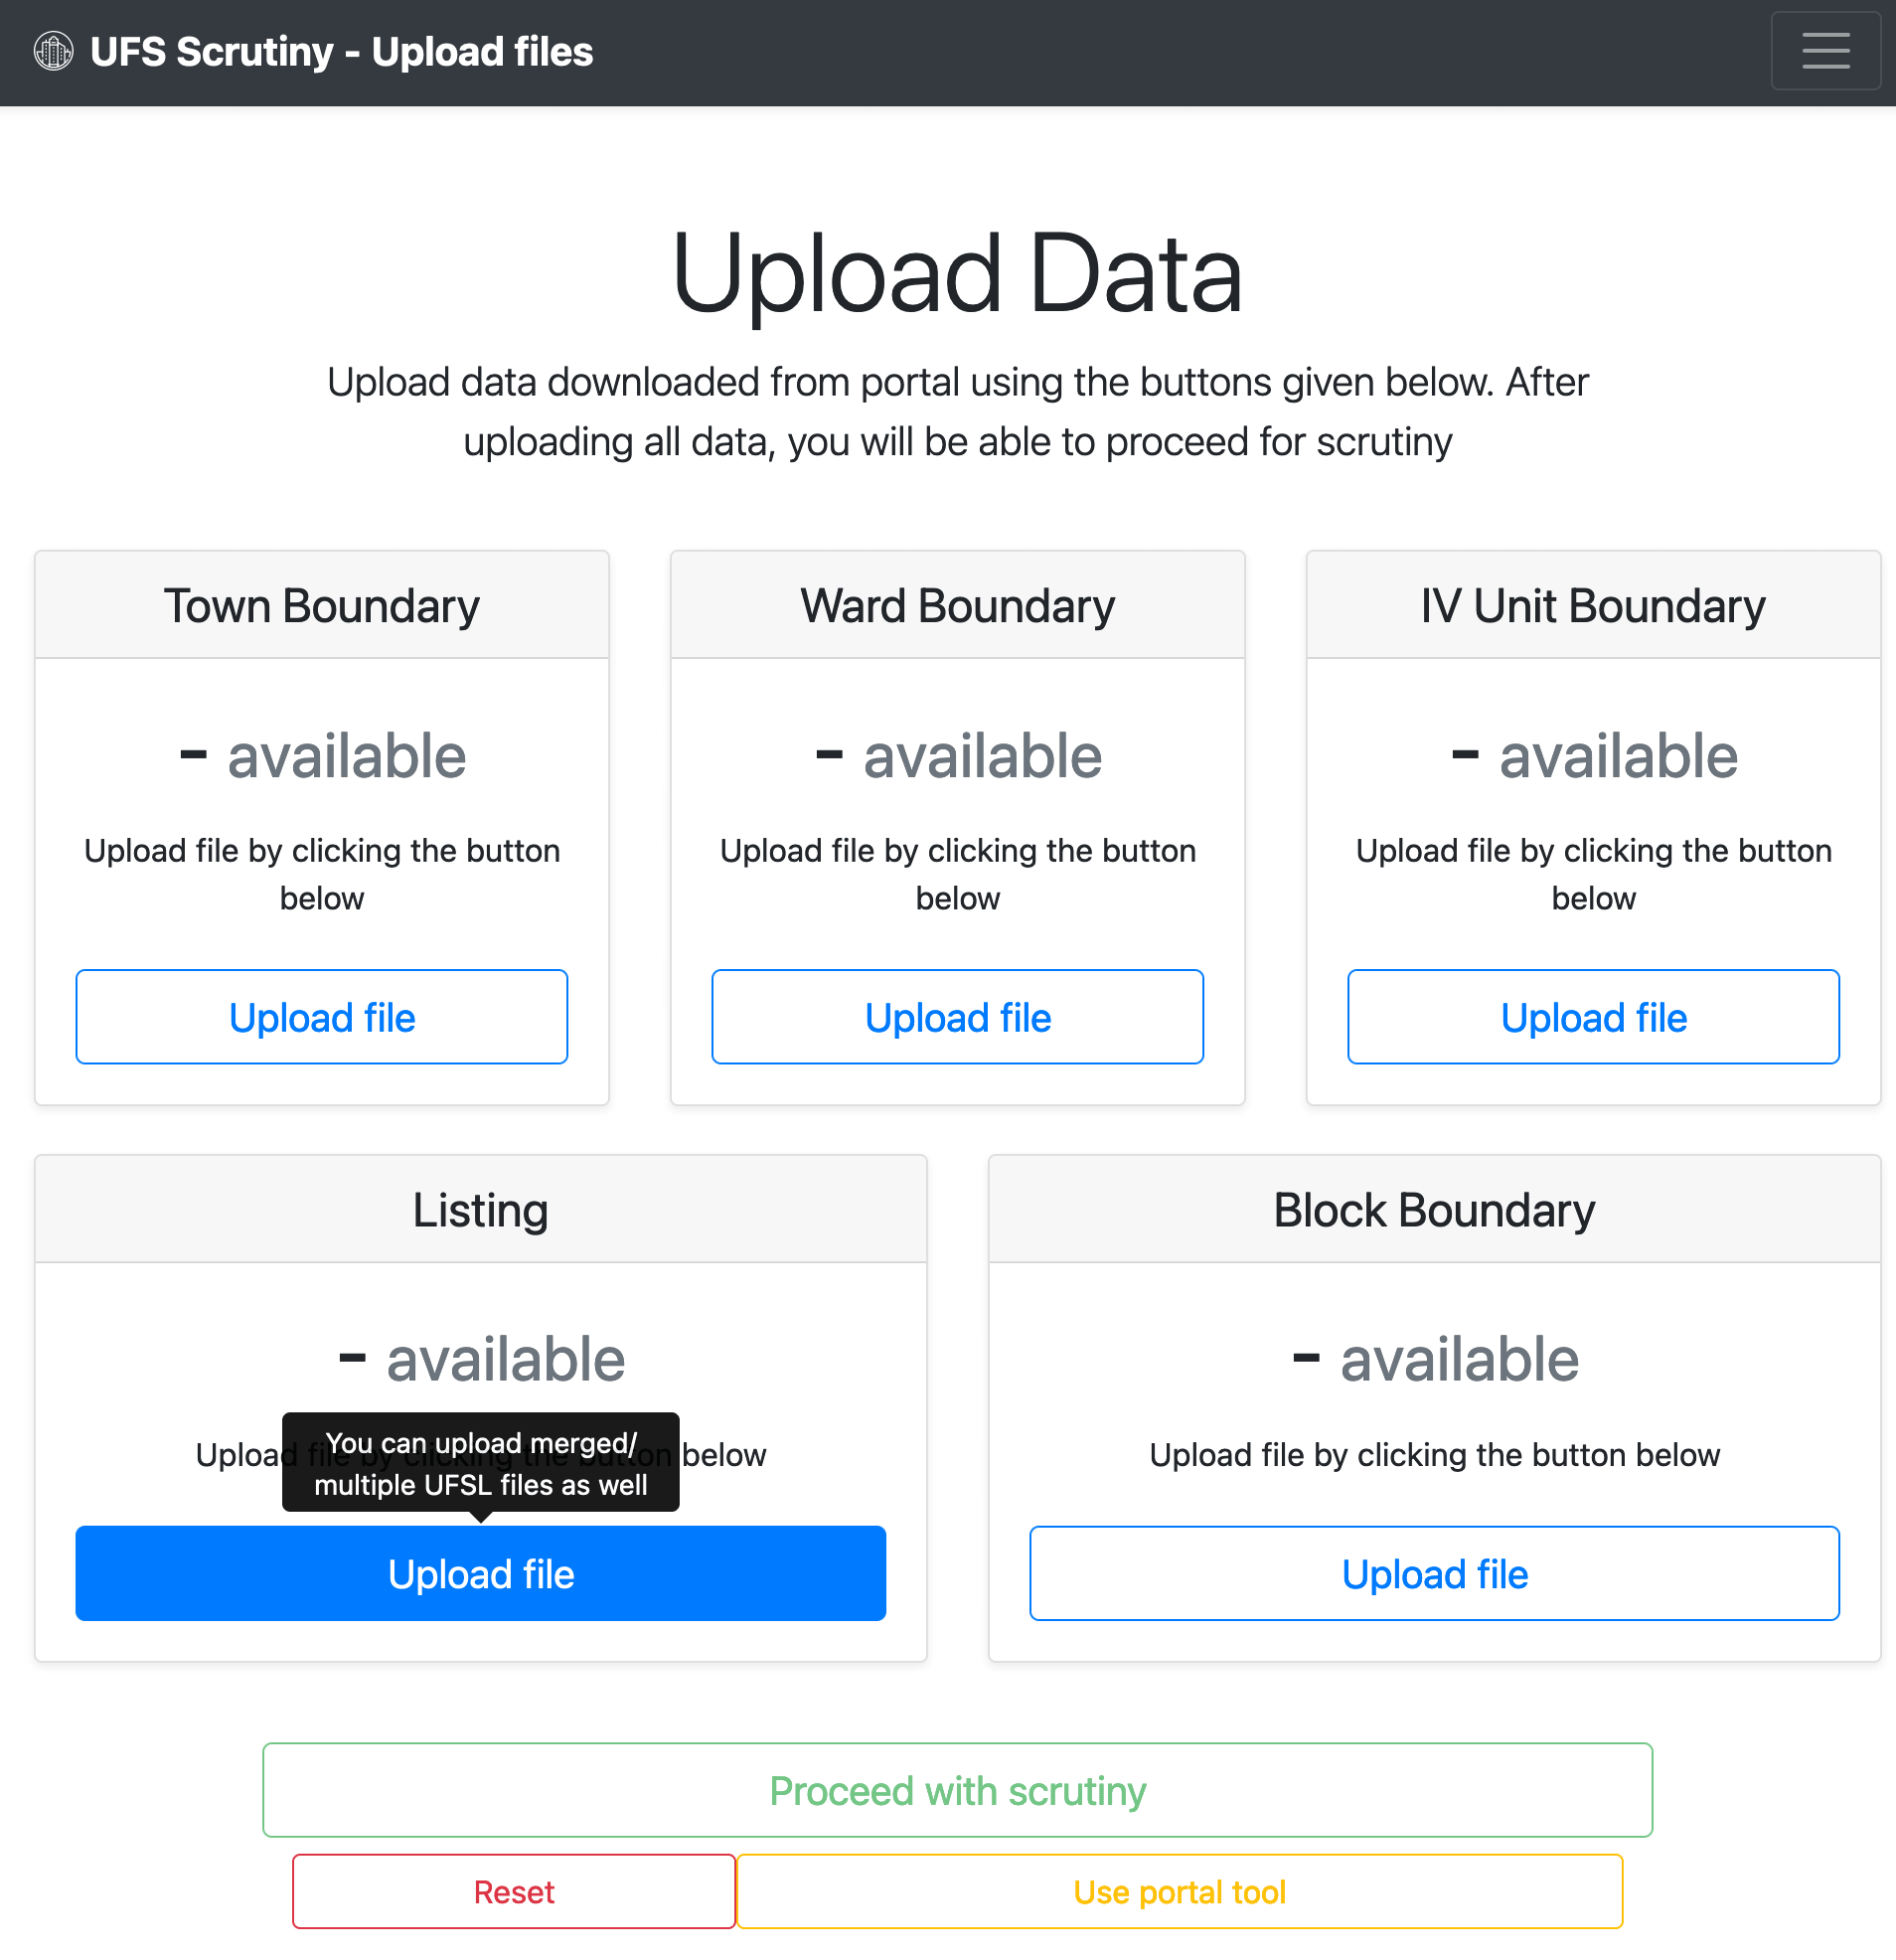
Uploading Files
To upload file, click the upload button given next to the boundary/listing box that you want to upload. Then select the Excel file from there and open with this tool. The tool will parse the file and show you the number of items available for that file in the box itself.
You can select file of any type using any of the button, and it will automatically detect the type of file selected and populate the data in that item. However, it may at times incorrectly recognize ward boundary as iv unit boundary (as they both have same set of attributes), so in case of ward boundary it is advised to use the button given in the box of ward boundary to upload the file.
Town Attributes
Once all type of files have been uploaded in the tool, it will enable the proceed button. On clicking the proceed button, you will be shown a dialog box where you will have to the choose the attributes about the town being uploaded.
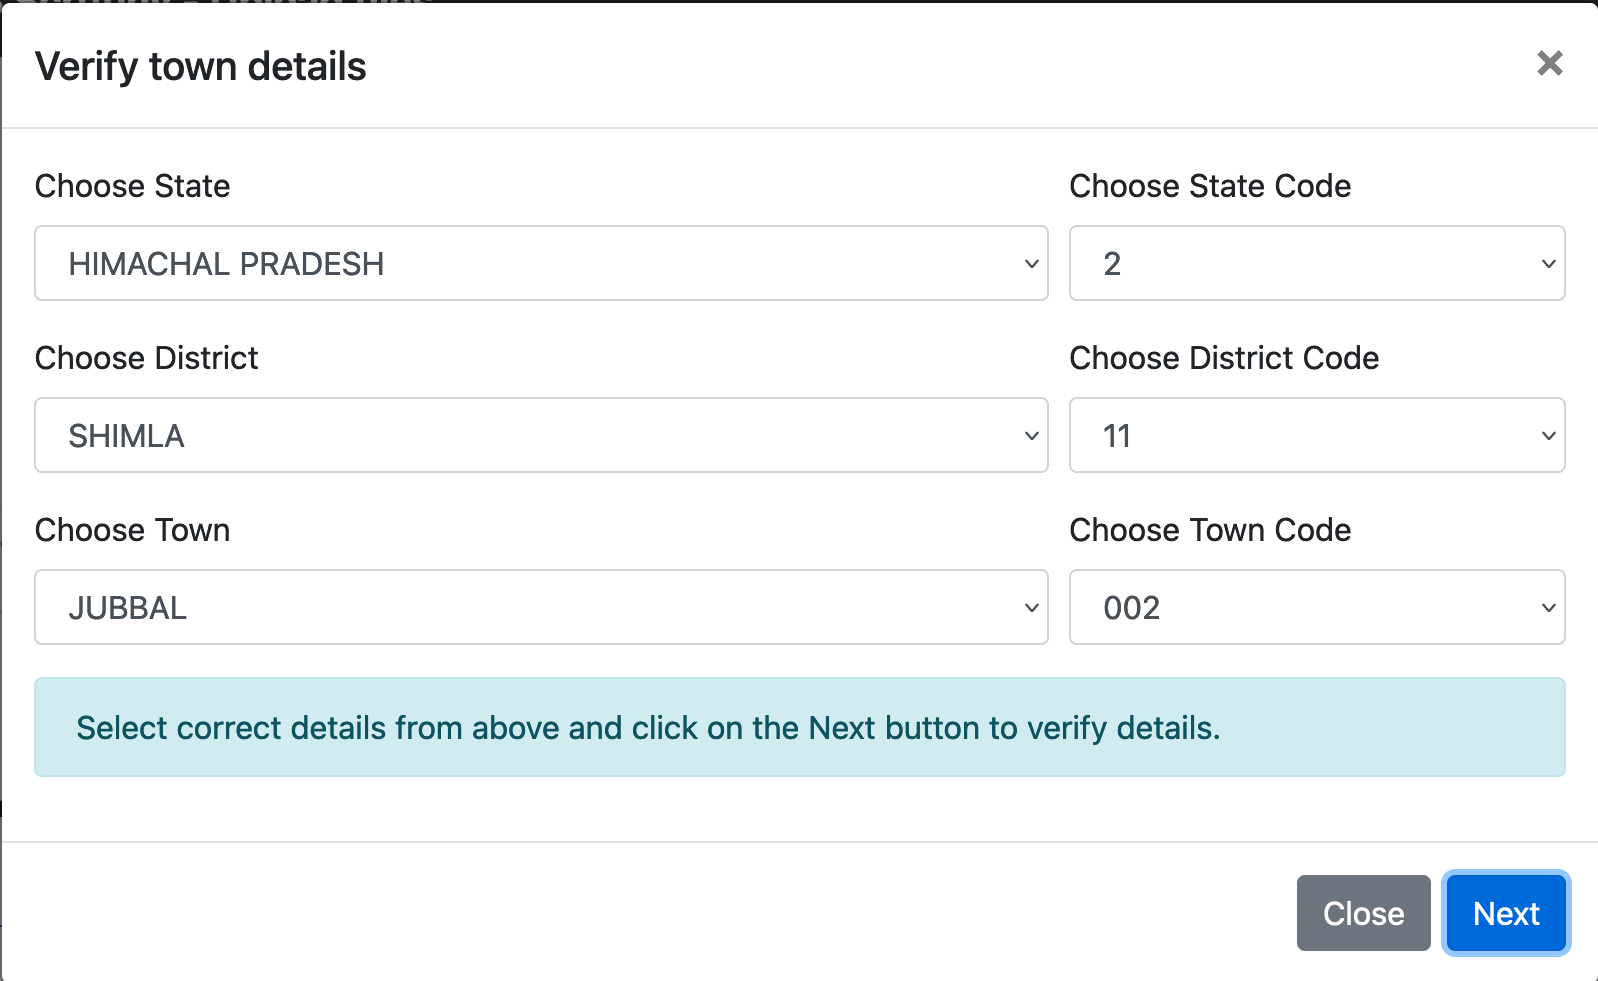
The values will be automatically selected for you, but if you need to choose another value, you may change as required.
After selecting all values, click on the next button. If there is any data missing in the uploaded data like listing for any one block is not uploaded, or if some boundary has not been uploaded which has data in it, or if there is a mismatch between IV-Ward pairing; the tool will warn you to remove these discrepancies first and then proceed with cleaned data.
If all the data is correct, you will be allowed to begin the scrutiny process as it was done in the alternate portal tool.
Note: Any changes you make to the data using this tool are not reflected back to the portal. They are temporary changes and will not be saved/updated into the source data. They are saved in your browser cache, and will be lost once the window is closed. You should modify the original data in the portal and then download the files again for use in this tool to conduct further scrutiny.
After conducting proper scrutiny, you can then proceed to generating the finalized schedules for the uploaded data.
Throughout the tool, you will see the user id as JSO0_0000000. This is a measure to make sure the portal functions smoothly, while the data you are working with can belong to any ID and it will work just fine.
Types of inconsistency
There are following inconsistencies that can be found in the data:
- Missing block boundary: If listing data for given block is present but no block boundary has been uploaded in respect of that block
- No listing data for block: If block boundary for given block number has been uploaded, but no listing data for this block has been uploaded
- No/multiple town boundary uploaded
- No listing data found for IV/Ward pair: For a give pair of ward and IV unit, no listing data has been uploaded
- No IV Unit/Ward boundary found for IV/Ward pair: Listing for a given pair of ward and IV unit number is found but no boundary reflects this pair
- Ward/IV pair overlap: Some ward is occurring in IVs which themselves contain multiple IVs and vice versa
The above cases are explained below with tips to remove them.
Missing block boundary
If some block boundary is reported as missing, then first check if the given values for IV/Ward/Block number pair exists or not. If it does not exist, most probably the source of error is the listing data. There should be at least one such entry where the combination of the three values is incorrectly reported. Detect such entries and correct them based on actual values.
The source of error could be in the portal data or in the UFSL merged data. Modify the data in the source and then generate the file again to fix the issue and then try again with the newly generated file.
Missing listing data
If some block has been shown as missing listing data, the possibility is that it has been canvassed using the UFSL app and you might have missed uploading the data in the tool.
In some cases, due to wrongly entering the Block/IV/Ward number pairs in the block boundary, it may show up as missing listing data. Double check to see that the values match exactly with the data in both the listing data and boundary data. If they do not match correct the data containing the inconsistent value and then try again.
No/multiple town boundary uploaded
The tool only accepts a single town boundary, and will not allow you to proceed if you have no town boundary or multiple town boundaries uploaded.
No listing data found for IV/Ward pair
If no listing data has been found for a given Ward and IV Unit pair, it is possible that the values given in the boundaries of iv unit and ward has some problem. Check the values corresponding to the pair highlighted for this mistake and rectify where the problem seems to be occurring.
Since, there can be no ward and IV unit without any population (i.e. listing data), each pair of ward and IV unit must have at least one listing data. If it is not present then this pair seems to be coming from the boundary itself, hence the culprit.
No IV Unit/Ward boundary found for IV/Ward pair
If a given pair of IV Unit and Ward number has some listing data associated with it but there is no boundary associated with this pair, it means one of the two things: either the listing data has wrong entry regarding the iv/ward pair or the pair has not been reflected properly in the boundary itself.
The problem could be in listing data, ward boundary or even the iv unit boundary. Find the problem and edit the related record to remove this inconsistency.
Ward/IV pair overlap
For each pair of iv units and wards, there are only three cases possible - either the iv unit will be bigger (contains multiple wards) or the ward will be bigger (contains multiple iv units) or both are equal (the ward covers one whole iv unit and vice versa).
If any ward has multiple iv units, then these iv units will only be present in this ward and no other ward. Similarly, if any iv unit has multiple wards, then these wards will only be present in this iv unit and no other iv unit.
If the above rule is not followed, i.e. for first case if one iv unit appears in multiple wards, there is a problem with this as one iv unit cannot be present in two wards where wards are bigger. Similarly, this applies to other way round as well. If this is found, then there is a problem and it needs rectification.
Generating Schedules
You can also generate the schedules using this tool form the data available in the portal (browser in case of finalizing tool). The following sections describe the data needed to generate these schedules and some checks that need to be satisfied to generate the schedules.
The schedule can be generated by all users who are not JSO and SSO. Also, the schedules can be generated using the finalizing tool.
Town Schedule
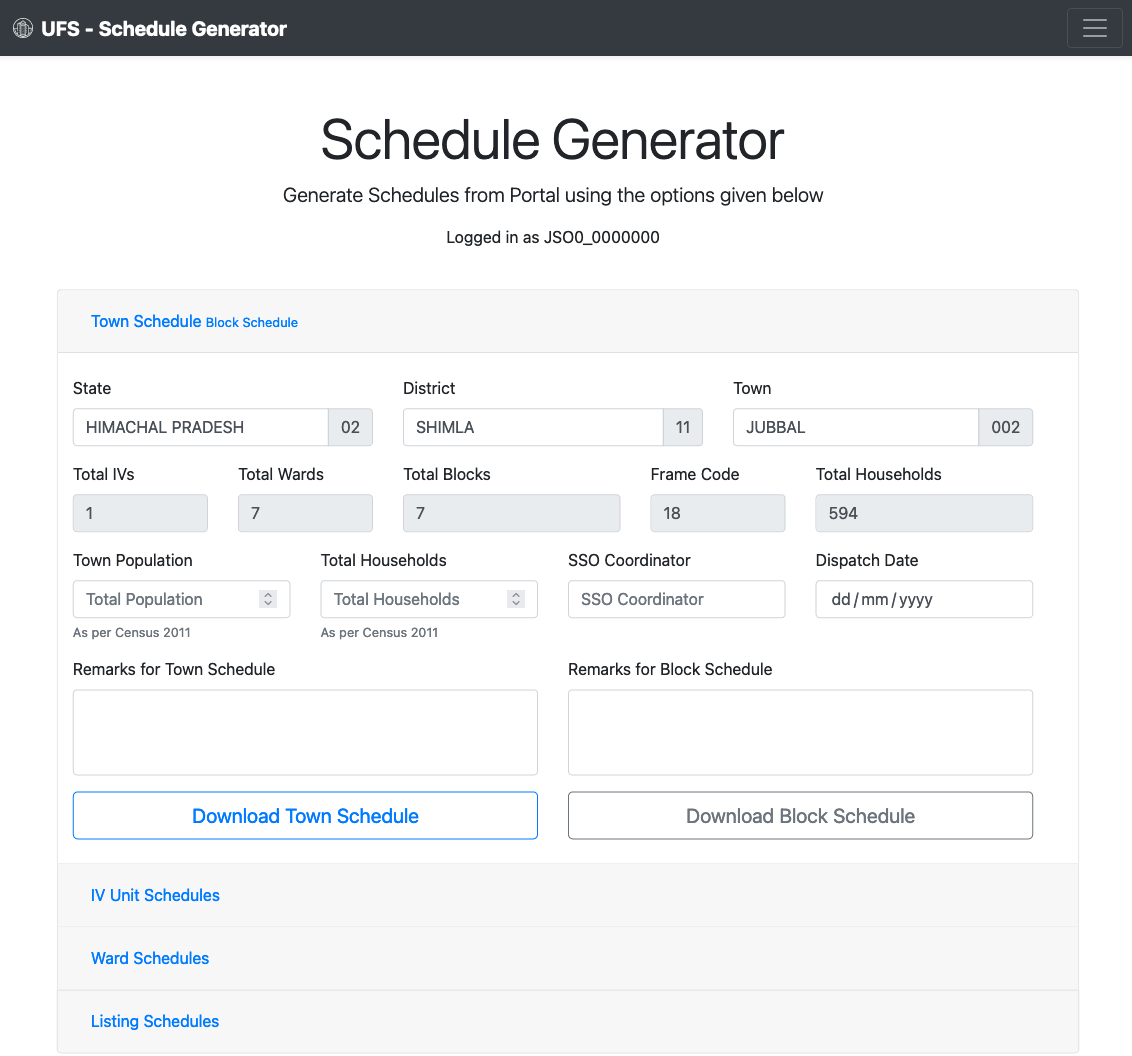
The town schedule will require a few details:
- Total Population of town as per census 2011
- Total households of town as per census 2011
- Name of SSO Coordinator
- Date of dispatch of schedules
- Remarks
After entering these details, click on the download town schedule button and the schedule will be generated and downloaded.
The date of dispatch of schedules should be greater than date of field work (end), inspection date (end) and scrutiny date.
Block Schedule
The block schedule also needs a few details:
- Total Population of town as per census 2011
- Total households of town as per census 2011
- Name of SSO Coordinator
- Date of dispatch of schedules
- Remarks
After entering these details, click on the download town schedule button and the schedule will be generated and downloaded.
IV Unit/Ward Schedule
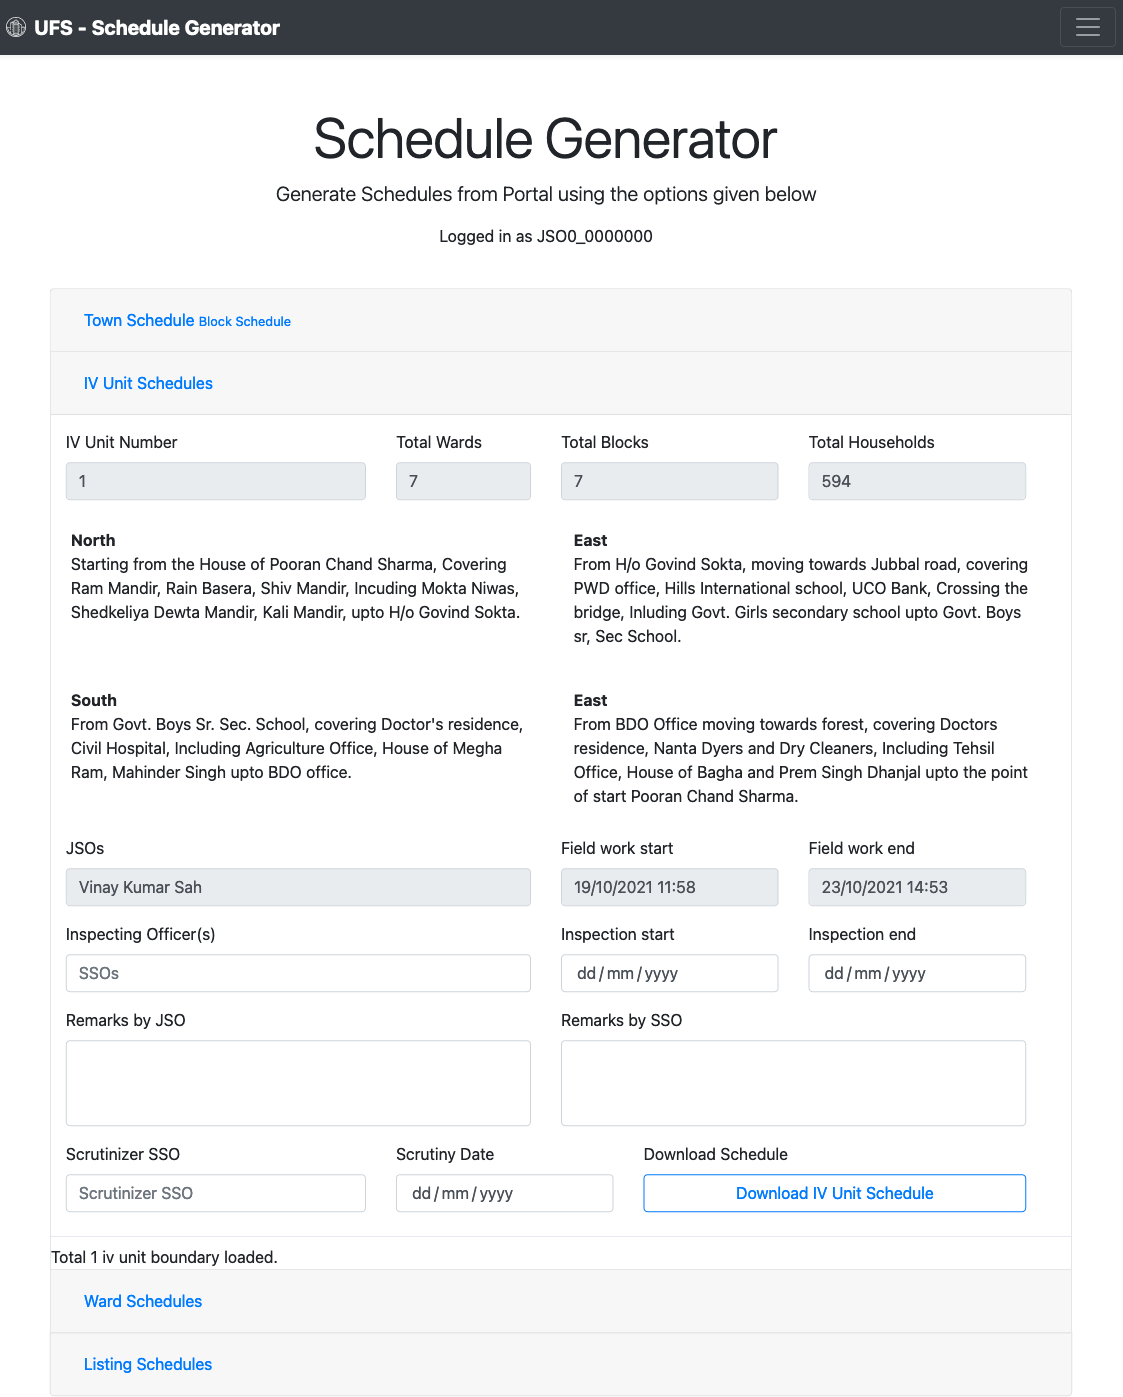
The ward and iv unit schedule are identical in both their output as well as fields required for generation:
- Name of inspecting officer(s)
- Inspection start date
- Inspection end date
- Remarks by JSO
- Remarks by SSO
- Scrutinizer SSO
- Scrutiny Date
After entering these details, click on the download schedule button and the schedule will be generated for download.
The date of scrutiny must be after end of inspection and field work but before the date of dispatch of schedules.
Listing Schedule
The listing schedule does not require any data for generation. Simply click the download button next to each block for generating the respective listing schedule.
You can also click on the view listing button to view the listing data before downloading the listing schedule.
 Portal Editor
ufs.vikesh.me
Portal Editor
ufs.vikesh.me